

This recipe for soft and tender gluten free Hawaiian rolls makes the perfect gluten free bread for any occasion—for everything from dinner rolls to burger buns!
")
Why you’ll love these gluten free Hawaiian rolls
The recipe for gluten free Hawaiian rolls from page 181 of Gluten-Free on a Shoestring Bakes Bread is just too good not to share. I’ve included everything you need to know about baking the best gluten free bread you’ve ever had, including how to make our gluten free bread flour.
This includes general shaping instructions for all the gluten free bread in the Bakes Bread book. It also includes specific instructions for shaping small, round rolls like these. Rolls like these are going to change the way you think about gluten free bread forever.
The instructions in the book for these Hawaiian Rolls are to make 12 dinner rolls, but these days I find myself making them into 8 full-size buns instead. They make the most delightful sandwiches!
I simply love the soft, tender crumb of the bread, and the way the outside browns just right. The dough can be handled more like “regular” bread dough. You might just think you’d reached for wheat flour!
Gluten free Hawaiian rolls ingredients
I’m sharing two variations of this recipe: one made with our gluten free bread flour, and the other made with a combination of Better Batter (or our mock Better Batter blend) and additional tapioca starch/flour.
Gluten free bread flour blend
The recipe variation that uses our gluten free bread flour blend (a combination of Better Batter classic blend all purpose gluten free flour, Expandex modified tapioca starch, and whey protein isolate) is somewhat simpler, requires less liquid, less butter, and calls for a bit more yeast.
It necessarily involves dairy, though. That’s just something to keep in mind as you choose the variation that best suits your needs.
Gluten free all purpose flour blend
The other gf Hawaiian rolls recipe variation relies on the addition of tapioca starch/flour, which helps add structure and chew to the rolls in a way that is usually unavailable without the use of gluten free bread flour. The best all purpose gluten free flour blend to use is Better Batter’s classic blend, which already contains tapioca starch, but you must add the additional tapioca starch for the recipe to work properly.
Instant yeast
I like baking with instant yeast, which is also called “breadmaker’s yeast” or “rapid rise yeast.” It’s just like active dry yeast, but has less of a protective shell around the single-strain commercial yeast so it doesn’t have to be soaked before adding it to the remaining bread dough ingredients.
If you’d like to replace the instant yeast with active dry yeast, you’ll need 25% more yeast, by weight, and you must soak the yeast first in some liquid from the recipe, until it becomes foamy. Here, where the recipe calls for 6 grams of instant yeast, you’d need 7.5 grams active dry yeast (for 7 grams instant yeast, it would be 8.75 grams active dry yeast).
Sugar
The 1/4 cup of granulated sugar in this roll recipe aids in browning of the rolls, and adds tenderness, too. It’s essential to the proper texture here.
Salt
Salt does a lot of important things in a yeast bread recipe! It helps retard the activity of the yeast, so it doesn’t overproduce; it also adds flavor and balances the sweetness.
Kosher salt is the most common salt used in baking, as it is much more difficult to overmeasure than table salt, which is much more concentrated, by volume. You can also use lightly flaked sea salt.
Butter
Butter adds richness and aids in browning of your Hawaiian rolls. Don’t skip it! For a dairy-free alternative, please scroll down to the ingredients and substitution section.
Pineapple juice
Hawaiian rolls get their telltale sweetness and flavor from pineapple juice in place of milk or water. You can buy pineapple juice in a can, or do what I usually do and drain the liquid from a can of pineapple slices in their own juice (not syrup!).
Vanilla extract
Since this is such a robust-flavored bread that is a bit on the sweet side, we add vanilla extract to enhance all of those lovely qualities.
The tools you’ll need for making gluten free Hawaiian bread
Food scale
For reliable baking reasults, always measure your ingredients (especially dry ingredients) by weight, not volume, whenever possible. The size of dry measuring cups is not standardized, and there is unavoidable human error that often causes overmeasuring of flour, no matter how experienced the baker.
You don’t need a fancy digital food scale. Escali is a great brand that makes a scale that should cost around $15 U.S.
Stand mixer with dough hook (GF bread flour blend) or paddle attachment (AP GF flour blend)
For this recipe, you simply can’t effectively mix your bread dough by hand, like you can with our gluten free artisan bread recipe. The raw dough isn’t wet enough to allow that sort of margin of error.
For the gf bread flour recipe, you’ll need an electric mixer with a dough hook (many handheld mixers also have dough hook attachments). For the all purpose gluten free flour blend variation, a paddle attachment is what you need. You might be able to use a food processor instead, but be very careful not to overprocess.
Bench scraper
One of the most useful tools in a baker’s kitchen is a bench scraper, which is one of the many kitchen tools stolen from the carpenter’s workbench. I simple metal bench scraper is ideal for folding the raw dough over on itself to smooth it out, and for dividing the dough into portions.
Proofing bucket
I use 2 liter Cambro brand proofing buckets for all of my bread dough. Whether I’m just letting the unshaped dough rest and absorb some of its moisture, and chill a bit for easier shaping, or giving the dough the time for a true first proofing, Cambro buckets seal tight like a drum.
Whenever you’re letting yeast bread dough rise in the refrigerator, keep in mind that it must be sealed very, very well. Otherwise, the moisture in the dough that you’ve worked so hard to incorporate will evaporate into the dry air of the refrigerator, and it will struggle to rise.
The best ways to serve gluten free Hawaiian rolls
I make these sweet gf Hawaiian rolls quite often for sandwiches (they make the best gf ham sandwich you’ve ever had!). To ensure that they rise evenly and not too high for stuffing with fillings, press each piece of raw dough into a flat disk.
You can also make these rolls into 10 or 12 portions, instead of 8, and roll them as we do our gluten free dinner rolls. Bake them crowded into a cast iron skillet or on a quarter sheet baking pan.
")
How to shape gluten free round rolls
The short video below shows the “scrape and fold” technique that I recommend using to shape my new style of gluten free bread dough. I can describe it with words, and I do in the recipe below. But there’s nothing like seeing it for yourself.
General gf bread flour bread shaping tips
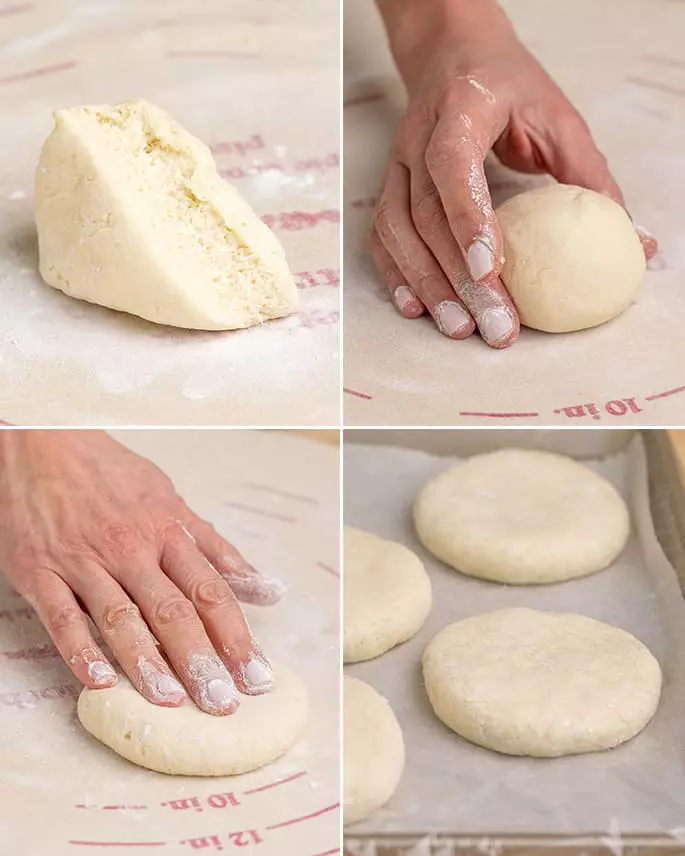
Always begin on a well-floured surface with floured hands. With the help of an oiled bench scraper, keep moving the dough as you shape it, particularly if it begins to stick to the surface or your hands.
The process of kneading the dough in this book will be done using the scrape-and-fold method. Scrape the dough off the floured surface with the bench scraper, then fold the dough over itself. Sprinkle the dough lightly with flour, scrape the dough up again, and fold it over itself again.
Repeat scraping and folding in this manner until the dough has become smoother. Keep the outside of the dough and the surface covered in a light coating of flour as you shape the dough. Handle the dough with a light touch to avoid kneading the flour into the dough, which might dry it out and result in a tight, unpleasant crumb.
A light touch is the key. Repeat that to yourself as a mantra as you first learn to shape this bread dough. It’s the most important rule in shaping. More technique, less muscle.
You’ll notice that the recipes do not include instructions to allow dough that has been rising in the refrigerator to come to room temperature before shaping. Always begin with cold dough when shaping the dough in this book. It is much easier to shape.
Shaping small round gluten free bread flour rolls
If you have previous experience shaping conventional yeast bread dough, all of that will come in quite handy here. This dough is not at all like the batter-style gluten free yeast bread dough. That dough can be shaped into rounds, but you must work with wet mounds of dough that looked more like cookie dough than bread dough.
On a well-floured surface, flatten the dough into a disk, then pull the edges toward the center of the disk and secure the edges together by pressing them between your thumb and forefinger. Turn the dough over so that the gathered edges are on the bottom and cup your whole hands around the dough, to coax it into a round shape.
Place the round of dough on a lightly floured surface and cup only one palm around the dough with the side of your hand resting on the counter (the side of your hand nearest your pinkie). Maintaining contact between the side of your hand and the surface, begin to move your hand in a circular motion while gently coaxing the edges of the dough upward (toward the top of the round) with the tips of your fingers.
To shape the dough made with our gluten free bread flour into rounds, be sure to work quickly, and use a light touch. If you have previous experience shaping conventional yeast bread dough, all of that will come in quite handy here.
")
Tips for proofing rise of gluten free Hawaiian roll dough
Whether you’re using the bread flour recipe or the all purpose gluten free flour recipe, this is an enriched dough, meaning it has butter and milk in it. For that reason, you don’t want too much yeast development which will flavor the bread and cause a more unpredictable, less controlled oven rise.
An extended first cold rise will result in rolls that have absorbed much of the moisture in the recipe, and are easier to handle and shape.
If the dough begins to “dimple,” it’s beginning to overproof, or rise too much. Be sure you get it right into the oven, then. You want a nice, smooth rise.
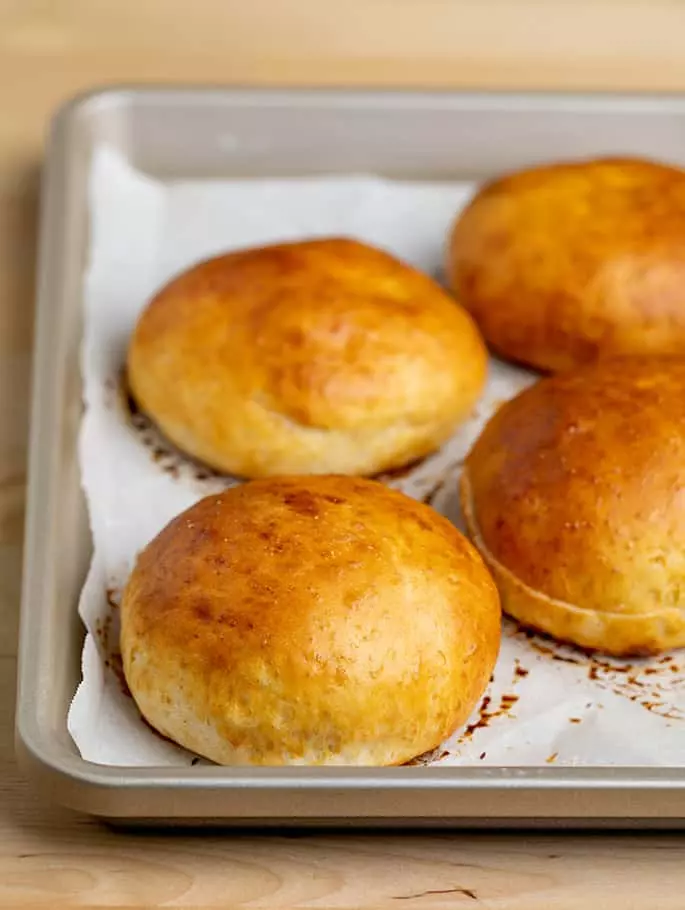
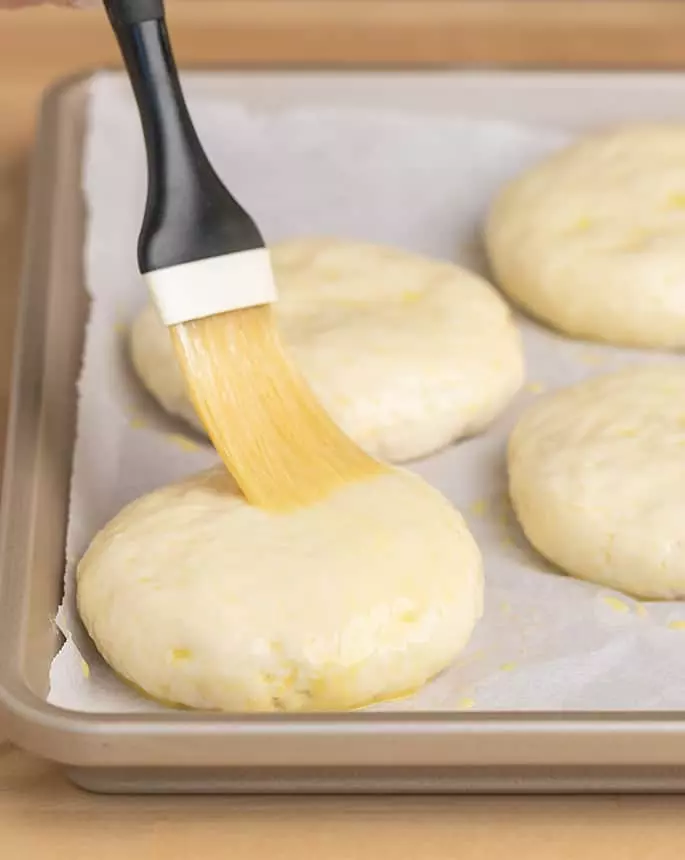
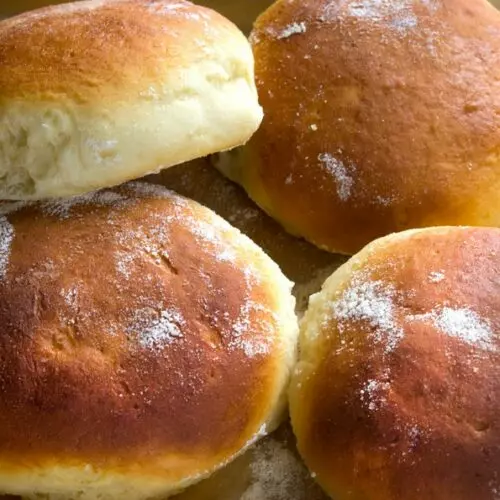
These rolls you see above weren’t topped with an egg wash before baking. The tops will still brown, but won’t shine. If you prefer a shininess to the top, add the egg wash!
Remember that good yeast bread takes time. This is not because it’s gluten free. It’s just the nature of yeast development.
")
More tips for making gluten free Hawaiian rolls
Weigh your GF Hawaiian rolls for consistent baking
For the most beautiful presentation, make rolls that are precisely the same size as one another. Simply weigh your dough after its first refrigerator rise, before dividing and shaping it, and divide the total number of grams by the number of rolls you’re making.
So if your dough weighs 950 grams total, if you’re planning to make 10 rolls, they’d be 95 grams each. You can pull off pieces of dough and weigh them individually before shaping, or divide by sight, and weigh each piece and correct as necessary.
")
Gluten free Hawaiian rolls substitutions
Dairy free, gluten free Hawaiian rolls
The butter in these rolls can easily be replaced with vegan butter. The real issue is the whey protein isolate in the gluten free bread flour. That absolutely requires dairy for the dough to behave as you see here.
The only dairy in the all purpose gluten free flour/tapioca starch flour recipe is the butter, though. So if you can’t have dairy, use our vegan butter replacement for dairy butter, and your gf Hawaiian rolls will be safely dairy free!
You can also try our gluten free hamburger buns with the dairy-free substitution instructions included right above the recipe card.
Egg free, gluten free Hawaiian rolls
These rolls contain only one egg in the dough, and one egg in an optional egg wash. If you can’t have eggs, eliminate the egg wash entirely, or replace it with some cream.
In place of the egg in the bread dough, you can try using a “chia egg.” Just place 1 tablespoon ground white chia seeds in a small bowl, add 1 tablespoon lukewarm water, mix and allow to gel.
Vegan gluten free Hawaiian rolls
If you use the dairy free and egg free ingredient suggestions above, and are mindful about how the sugar you use is refined, you will have made vegan gluten free Hawaiian rolls!
")
FAQs
Are Hawaiian rolls gluten free?
No! Unless you’re using a gluten free recipe, Hawaiian rolls are made with conventional wheat flour and are not gluten free. That’s why you need our recipe. :)
Are King’s Hawaiian rolls gluten free?
Sadly, no. King’s brand does not make gluten free Hawaiian rolls. Again, we’ve got you covered here!
What do gluten free Hawaiian rolls taste like?
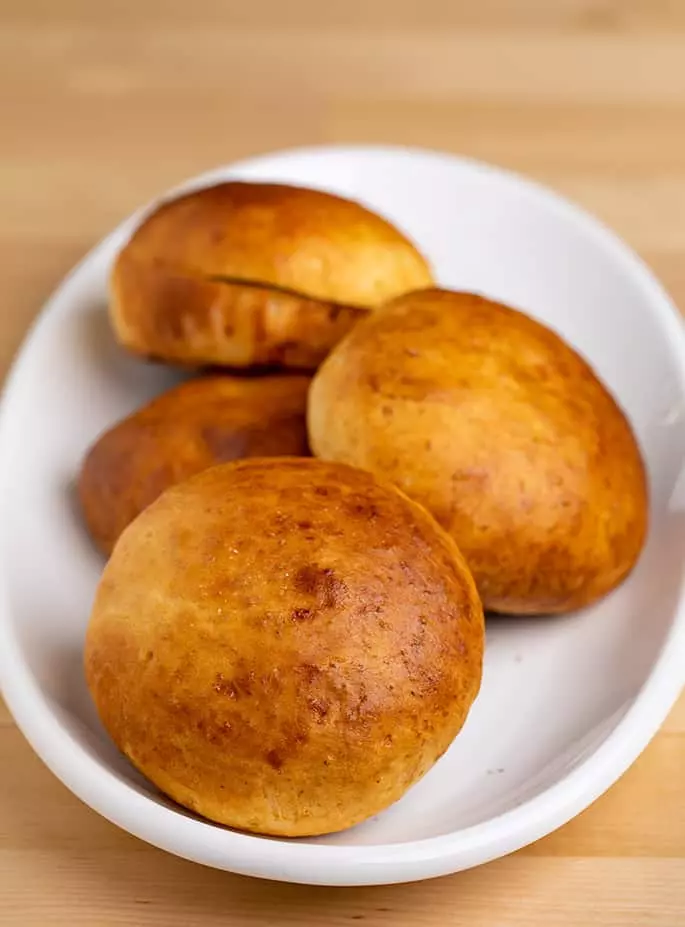
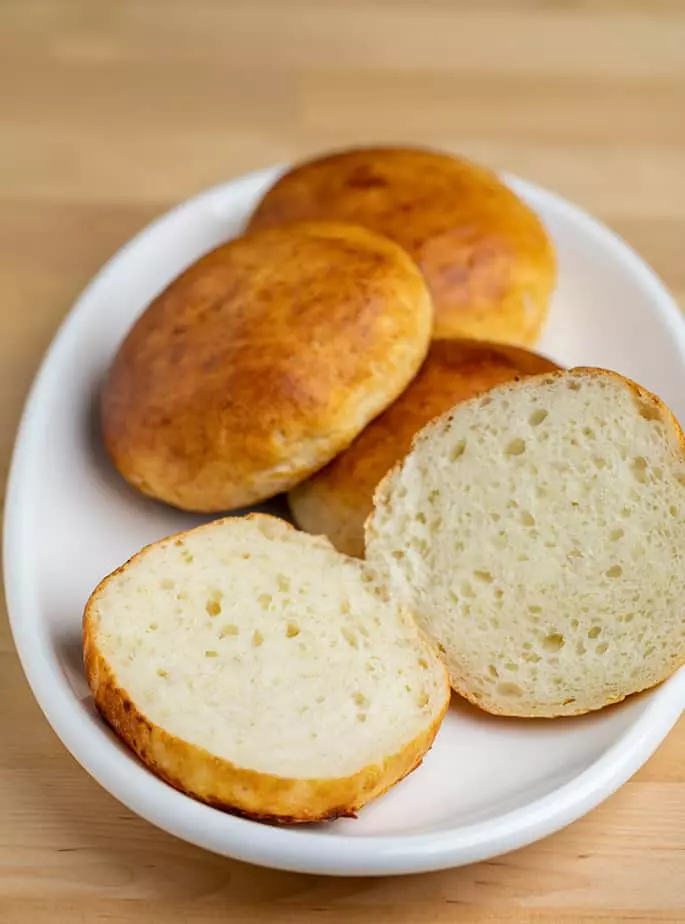
Hawaiian rolls taste incredibly tender, with a dense but pillow-soft crumb. Don’t forget about that beautiful, deep brown but super soft crust!
What’s the best gf flour for this gluten free Hawaiian bread recipe?
I enjoy both variations of this gluten free Hawaiian roll recipe, so it’s hard for me to choose between the gluten free bread flour one and the one made with Better Batter and tapioca starch/flour. Make them both and you decide!
Why did my Hawaiian gluten free bread come out so dense?
If your rolls came out dense, there are a few possible reasons. As yourself:
- Did you make any ingredient substitutions, particularly the gf flour blend and did you measure your ingredients by weight?
- Was your instant yeast active? Were your ingredients at the temperature specified in the ingredients list?
- Did you allow your rolls enough time time rise, and then bake them in a hot oven, as directed?
- Did you add more gf flour for shaping than is truly necessary? Incorporating too much flour during shaping is a very common mistake, and it lowers the hydration ratio which inhibits yeast production.
Can I freeze this gluten free sweet bread?
Yes! These rolls freeze so well. Just let them cool completely, then slice them in half horizontally, wrap them tightly in a freezer safe bag or wrap, and freeze.
To refresh previously frozen rolls, let them thaw at room temperature or in the microwave at low power, sprinkle with some water, and refresh in a 300°F oven or toaster oven. Good as new!
How to make delicious gluten free Hawaiian rolls, step by step
Gluten Free Hawaiian Rolls | with bread shaping videos
Equipment
- Stand mixer with dough hook (gf bread flour) or paddle attachment (all purpose gf flour)
Ingredients
For Hawaiian rolls with gf bread flour
- 3 cups Gluten Free Bread Flour blend (please click through for full details; you must use this blend)
- 2 teaspoons instant yeast
- ¼ cup granulated sugar
- 1 teaspoon kosher salt
- 4 tablespoons unsalted butter at room temperature
- 1 egg at room temperature, beaten
- 17 tablespoons pineapple juice at room temperature (1 cup + 1 tablespoon)
- 1 teaspoon vanilla extract
- Egg wash 1 large egg, at room temperature, beaten with 1 tablespoon water
For Hawaiian rolls with AP gf flour
- 2.5 cups all purpose gluten free flour blend I used and highly recommend Better Batter here
- 1 teaspoon xanthan gum omit if your blend already contains it
- ½ cup tapioca starch/flour plus more for sprinkling
- 2 ⅓ teaspoons instant yeast
- ¼ cup granulated sugar
- 1 teaspoon kosher salt
- 5 tablespoons unsalted butter softened
- 1 egg at room temperature
- 1 ¼ cups pineapple juice at room temperature
- 1 teaspoon vanilla extract
- Egg wash 1 large egg, at room temperature, beaten with 1 tablespoon water
Instructions
Make the bread dough.
- Place the flours (gf bread flour OR all purpose gluten free flour blend, xanthan gum, and tapioca starch/flour), yeast, and sugar in the bowl of your stand mixer, and use a handheld whisk to combine well. Add the salt, and whisk to combine.
- Add the butter, egg, pineapple juice, and vanilla, and mix on low speed (with the dough hook for the bread flour blend or the paddle attachment otherwise) until combined. Raise the mixer speed to medium and knead (or beat) for about 5 minutes.
- The dough will be quite sticky, but should be smooth and stretchy. For the all purpose gluten free flour blend variation, continue to beat the batter with the paddle attachment until it begins to take on a whipped appearance.
- Spray a silicone spatula lightly with cooking oil spray, and scrape down the sides of the bowl.
- Transfer the dough to a lightly oiled bowl or proofing bucket large enough for the dough to rise to double its size, and cover with an oiled piece of plastic wrap (or the oiled top of your proofing bucket).
- Place the dough in the refrigerator for at least 12 hours and up to 3 days.
Shape the rolls.
- On baking day, line a rimmed baking sheet and set it aside. Remove the dough from the refrigerator and turn it out onto a lightly floured surface. Knead until smoother as described in the General Shaping Tips below (See Recipe Notes).
- With a floured bench scraper, divide the dough into 8 pieces of equal size. Shape one piece into a round by following the Directions for Shaping Small, Round Rolls below (See Recipe Notes).
- Place the first roll in the prepared baking pan. Repeat with the remaining pieces of dough, placing the rolls less than an inch apart from one another.
Let the shaped rolls rise.
- Cover the baking pan with oiled plastic wrap and set it aside in a warm, draft-free location to rise for 30 minutes.
- Uncover the pan and brush the rolls generously with the egg wash. Allow the rolls to finish rising, uncovered, until nearly doubled in size, about 20 minutes more. If the rolls begin to take on a dimpled appearance, they have begun to overproof.
To bake the rolls.
- About 20 minutes before the rolls have completed their final rise, preheat your oven (to 350°F for the bread flour dough and 375°F for the all purpose gf flour dough).
- Place the baking pan on the lower rack of the preheated oven and bake until lightly golden brown, and the inside of the rolls registers about 185°F on an instant-read thermometer (about 20 minutes for bread flour; 25 minutes for the other variation).
- To maintain the softest rolls, cover the hot rolls, just out of the oven, loosely with a tea towel. Allow the rolls to cool briefly before slicing and serving.
- Once completely cool, leftover rolls can be wrapped tightly in freezer-safe wrap and frozen for up to 4 months. Defrost at room temperature, sprinkle lightly with water, and refresh in the microwave or a toaster oven.
Notes
Scrape the dough off the floured surface with the bench scraper, then fold the dough over itself. Sprinkle the dough lightly with flour, scrape the dough up again, and fold it over itself again. Repeat scraping and folding in this manner until the dough has become smoother.
Keep the outside of the dough and the surface covered in a light coating of flour as you shape the dough. Handle the dough with a light touch to avoid kneading the flour into the dough, which might dry it out and result in a tight, unpleasant crumb.
A light touch is the key. Repeat that to yourself as a mantra as you first learn to shape this bread dough. It’s the most important rule in shaping. More technique, less muscle.
You’ll notice that the recipes do not include instructions to allow dough that has been rising in the refrigerator to come to room temperature before shaping. Always begin with cold dough when shaping the dough in this book. It is much easier to shape. How to shape small gluten free round rolls. On a well-floured surface, flatten the dough into a disk, then pull the edges toward the center of the disk and secure the edges together by pressing them between your thumb and forefinger.
Turn the dough over so that the gathered edges are on the bottom and cup your whole hands around the dough, to coax it into a round shape.
Place the round of dough on a lightly floured surface and cup only one palm around the dough with the side of your hand resting on the counter (the side of your hand nearest your pinkie). Maintaining contact between the side of your hand and the surface, begin to move your hand in a circular motion while gently coaxing the edges of the dough upward (toward the top of the round) with the tips of your fingers. GF Hawaiian rolls bread flour blend recipe from the book Gluten-Free on a Shoestring Bakes Bread: Biscuits, Bagels, Buns, and More by Nicole Hunn. Excerpted by arrangement with Da Capo Lifelong, a member of the Perseus Books Group. Copyright © 2013. Blog recipe revised in 2019, and again in 2022 (added variation without gluten free bread flour, including photos and video).
The post Gluten Free Hawaiian Rolls | 2 Recipes & GF Bread Shaping Videos appeared first on Gluten Free on a Shoestring.