

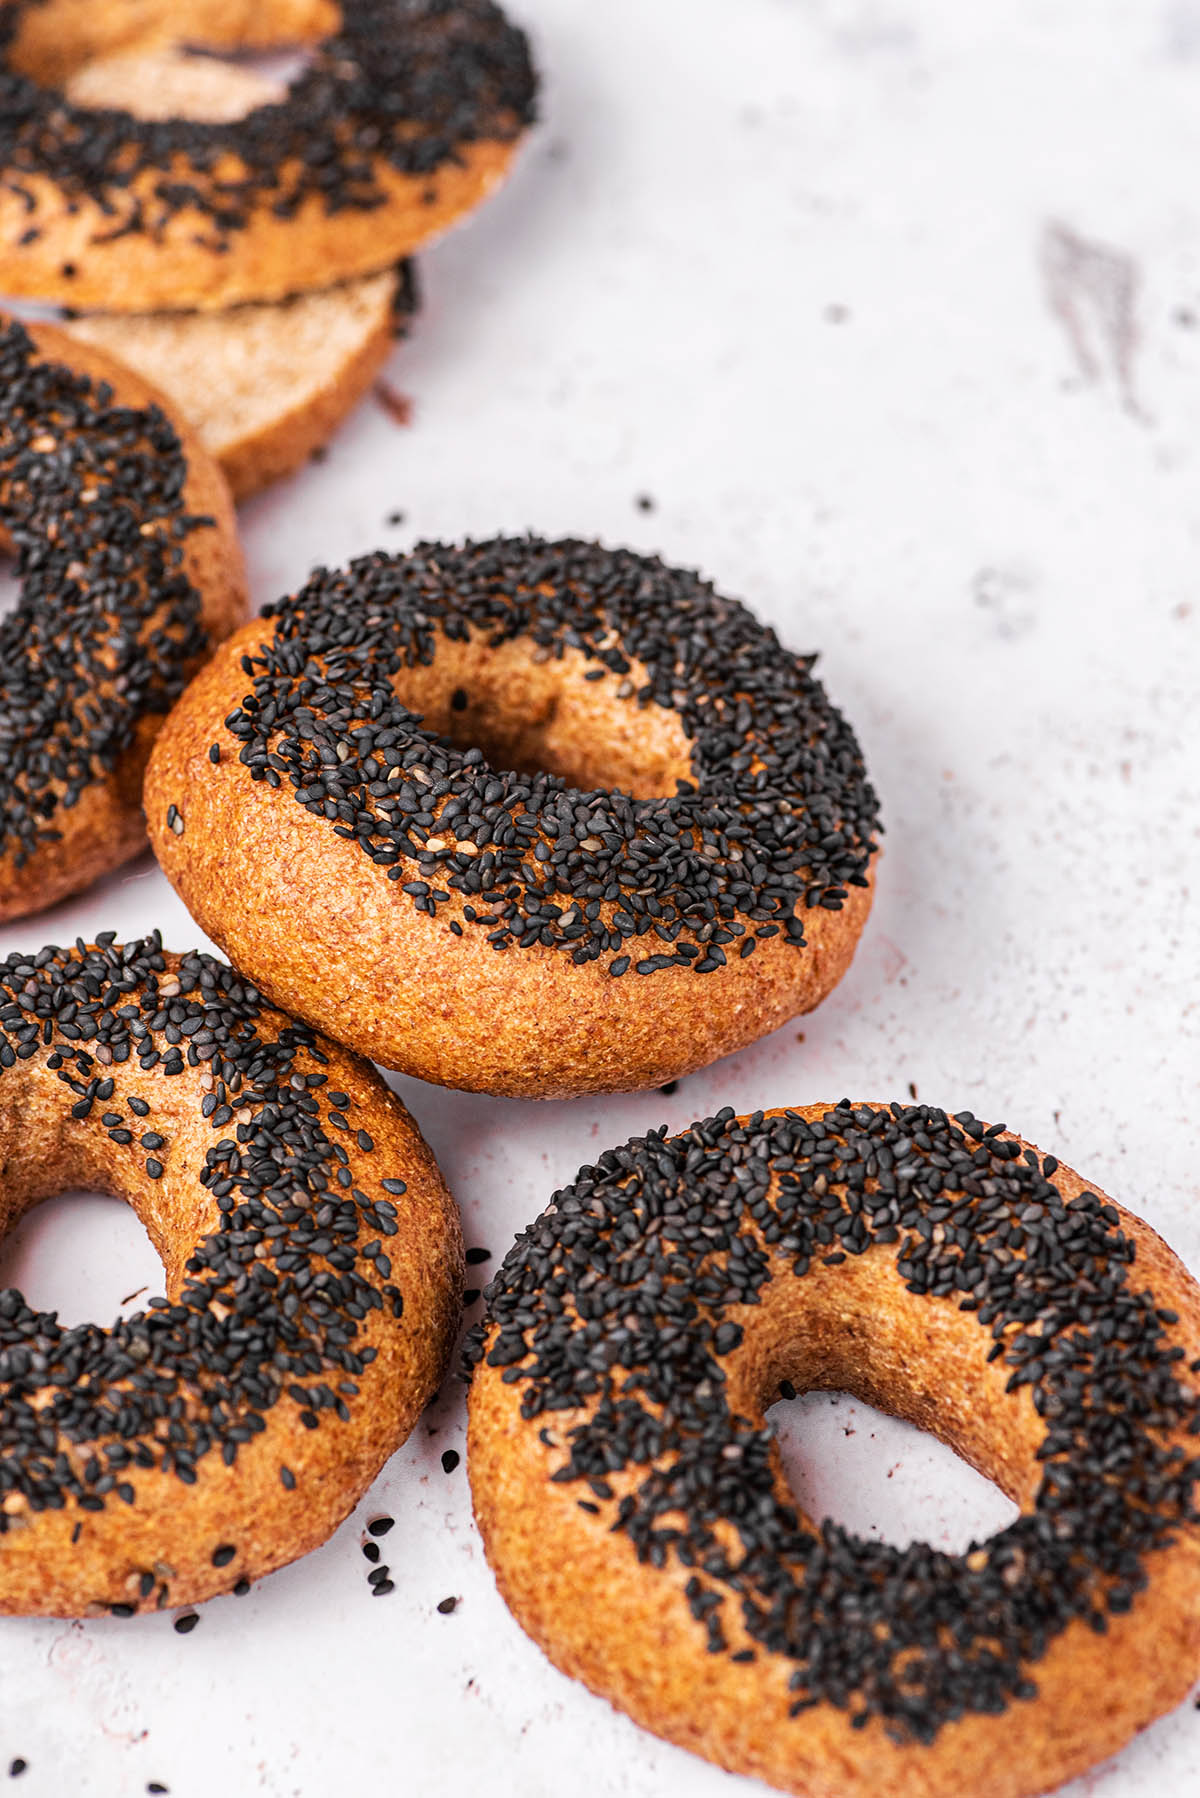
New York style whole wheat sourdough bagels, made with 100% whole wheat flour. These chewy, crispy bagels make the best wholesome breakfast. This recipe is adapted from our New York Style Sourdough Bagels.

There’s no better breakfast than a good bagel with cream cheese, and these whole wheat sourdough bagels are a healthier version of the classic. With a great flavour and surprisingly easy to make, they’re a go-to recipe in our kitchens.
You need some time, as with all sourdough recipes, but the active work needed isn’t very much. That being said, they do need kneading, and we recommend doing it by hand unless you have a really excellent standing mixer – it’s a low hydration dough.
Even with plain flour, sourdough always has a superior flavour. With nutty whole wheat flour, though, you get the best of both worlds.
[feast_advanced_jump_to]
Use the JUMP TO RECIPE button at the top of the post, or scroll to the bottom of the post, to see the full recipe card with ingredient measurements and instructions.
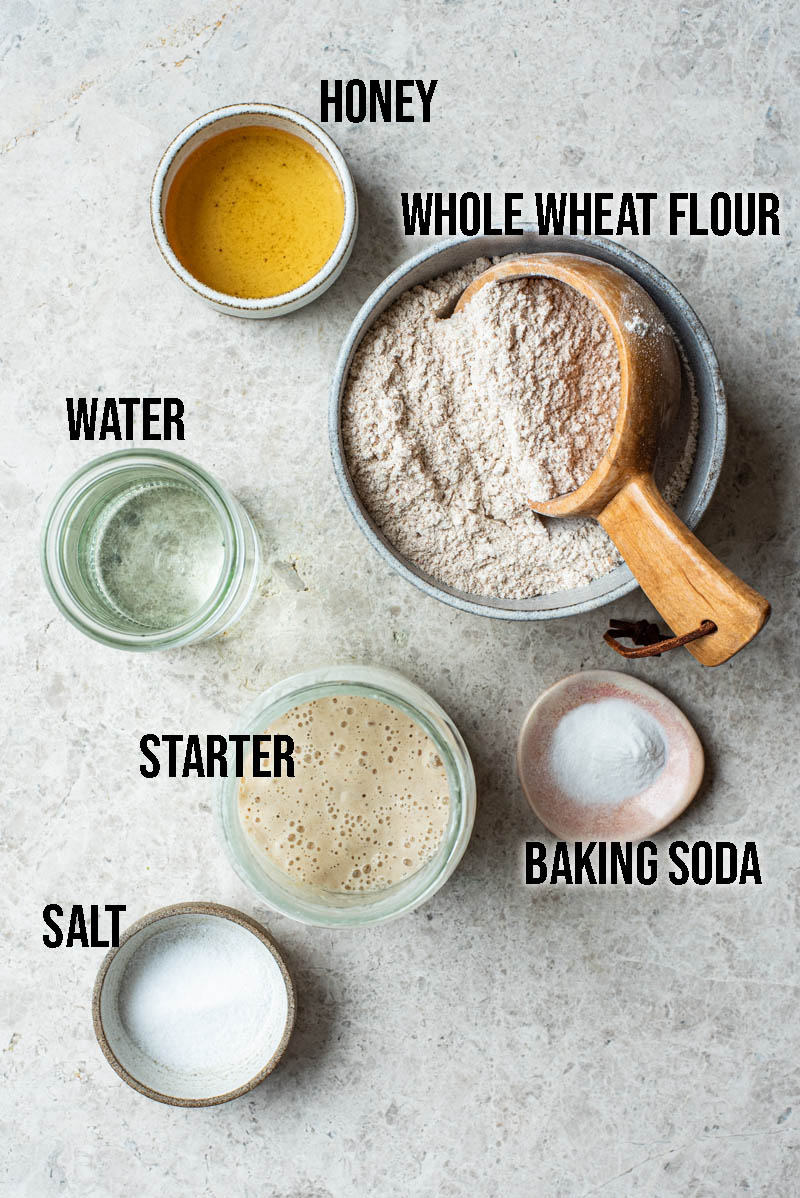
Ingredients
Method
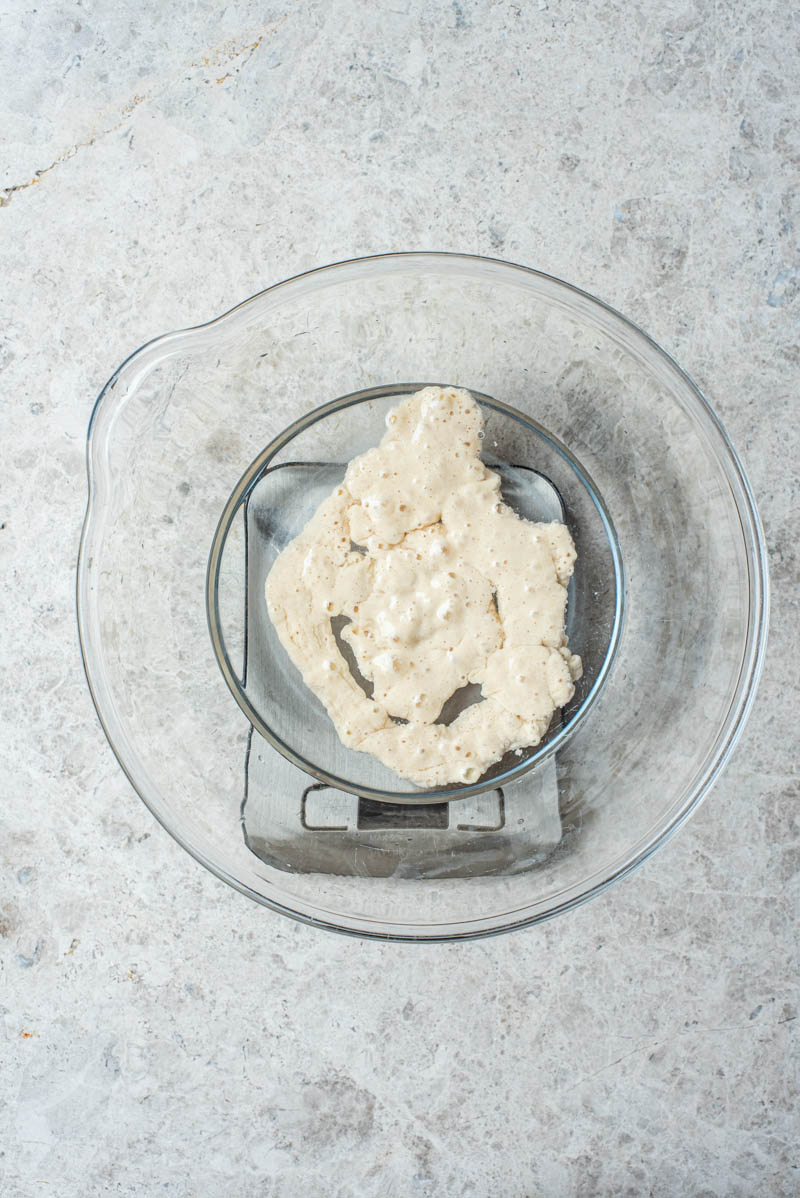
Measure out starter and water in a large bowl. 
Whisk to combine. 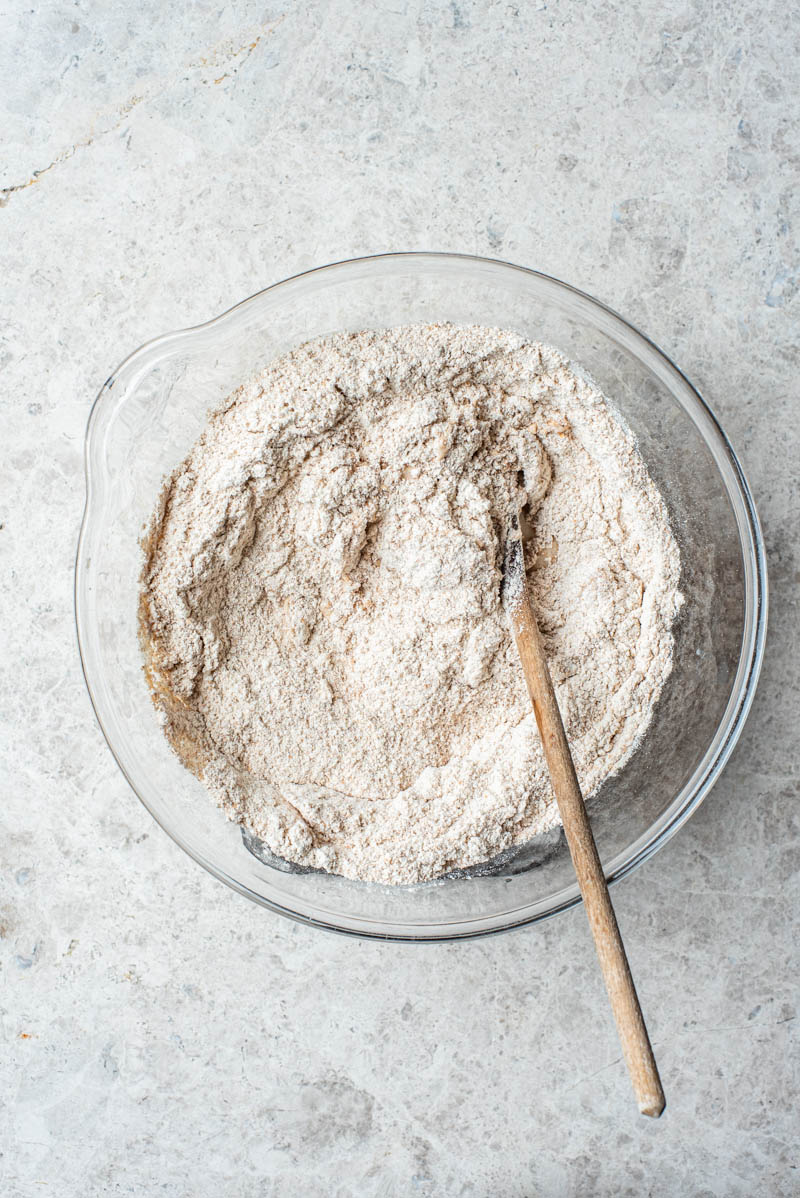
Add dry ingredients. 
Mix into a shaggy dough. 
Knead, preferably by hand. 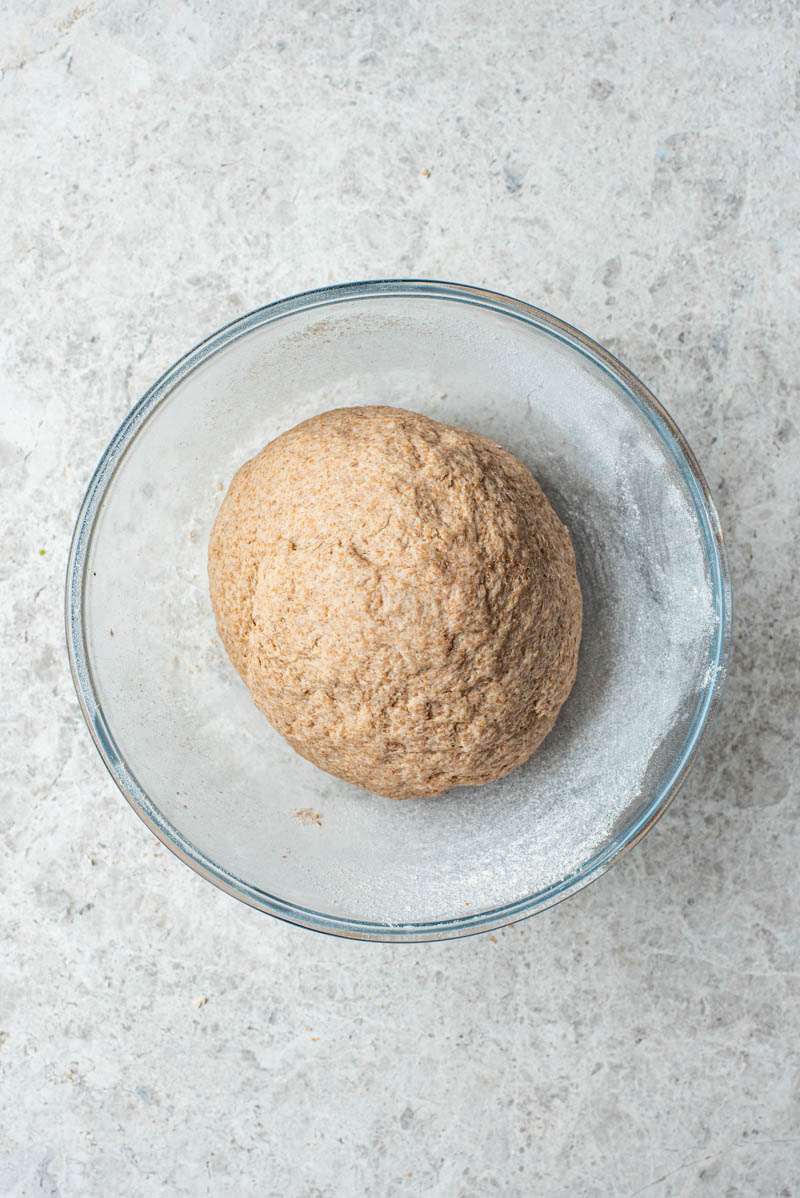
Until a smooth dough forms, then rest. 
Weigh the whole dough. 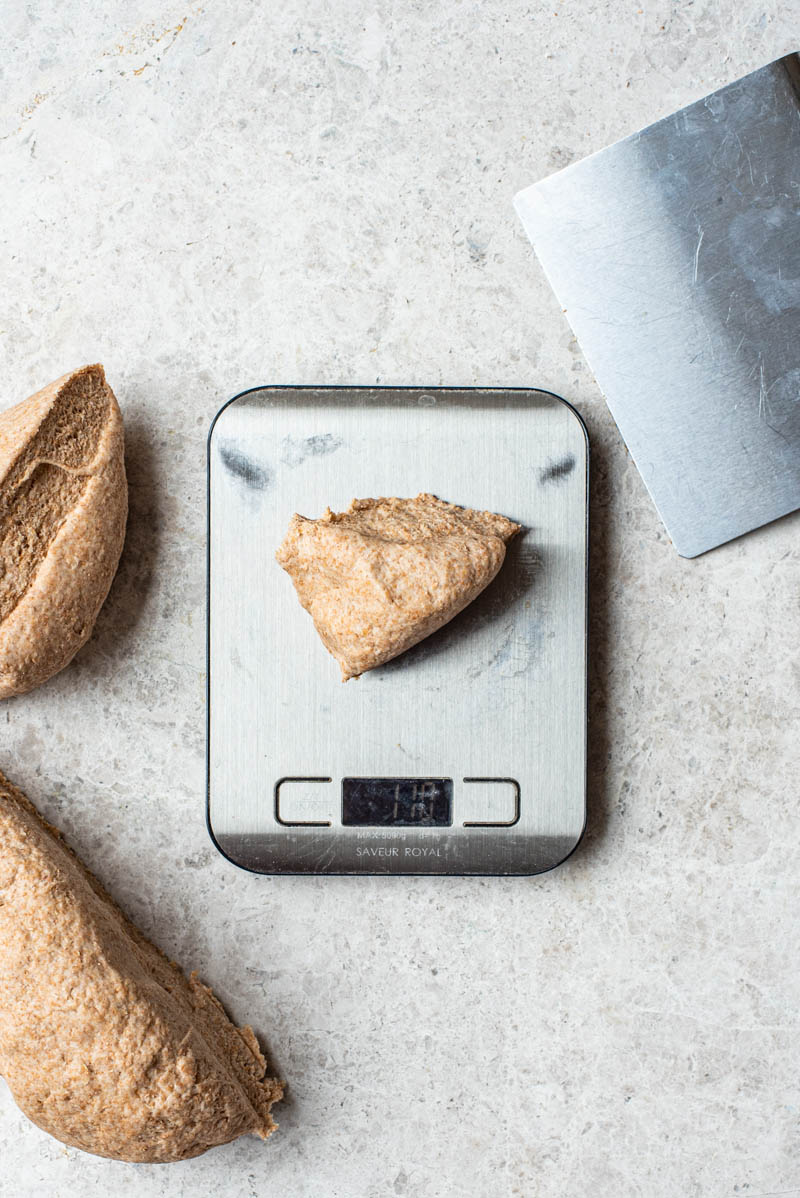
Divide into equal pieces. 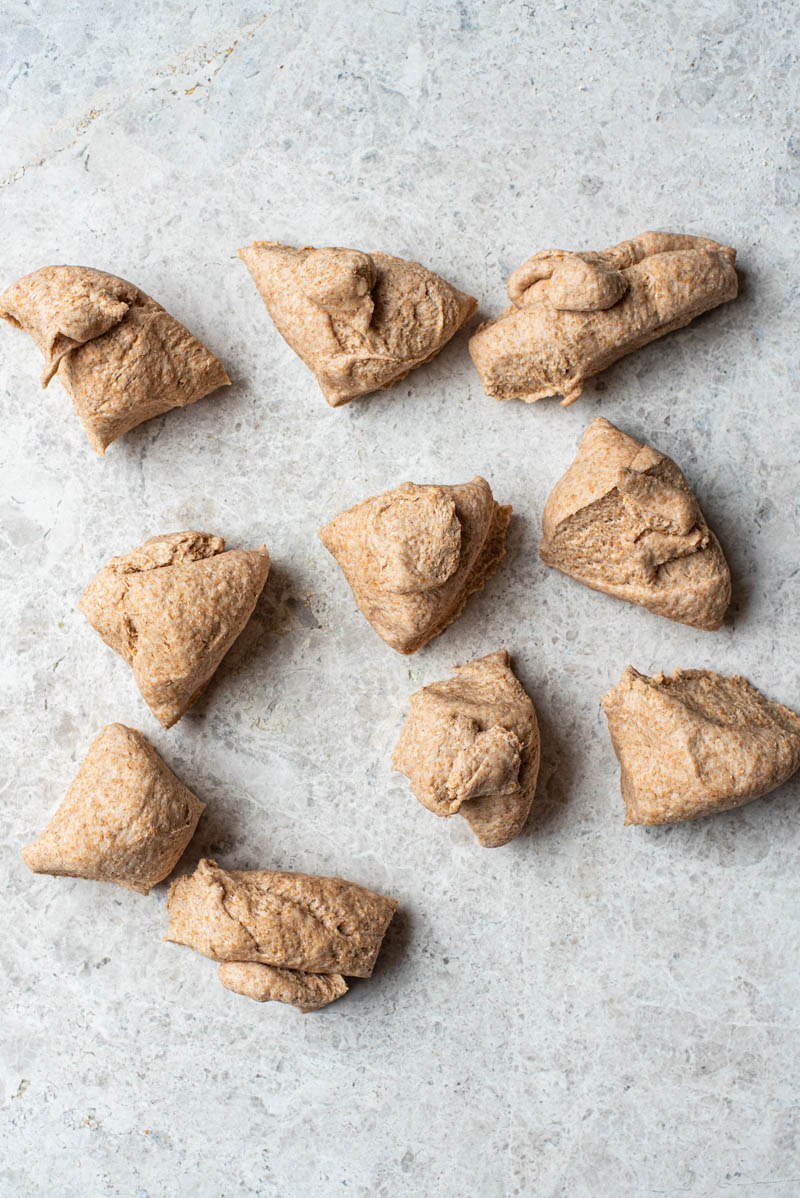
This recipe makes ten bagels, about 110g each. 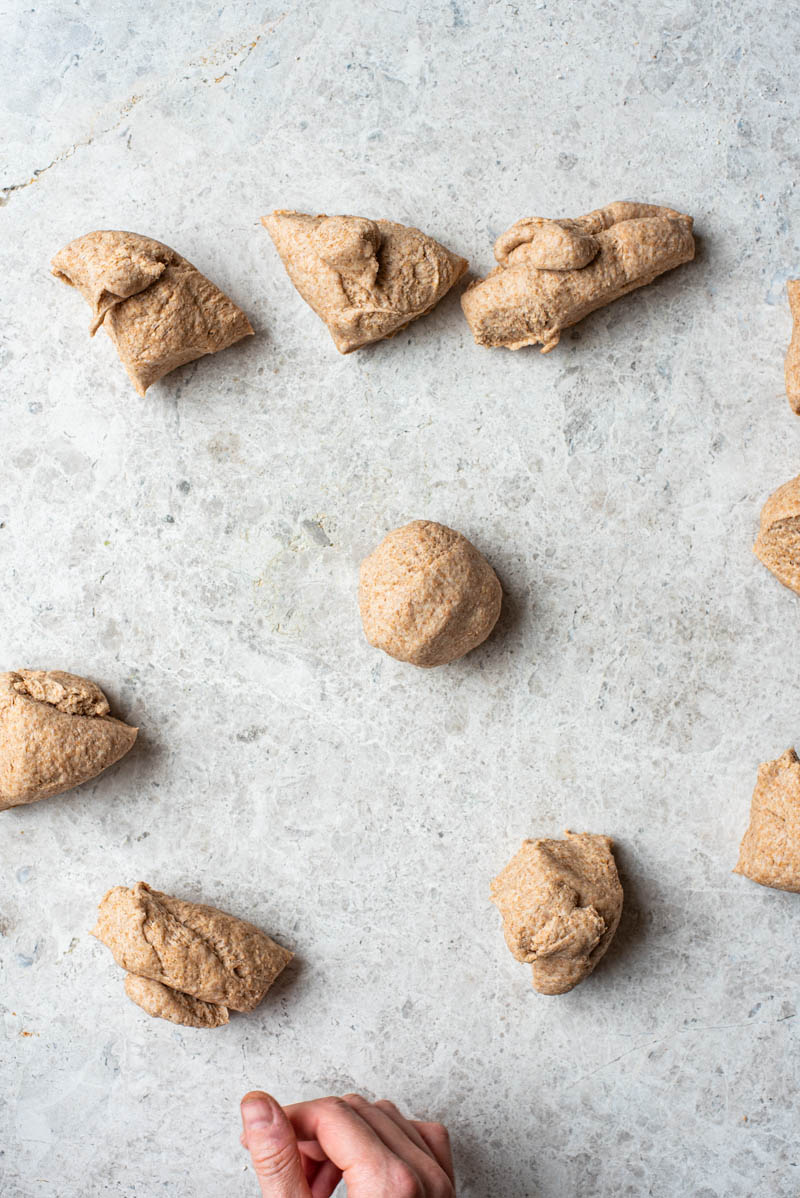
Form into rough balls. 
Roll the dough balls on a surface to create tension. 
Set aside to rest again. 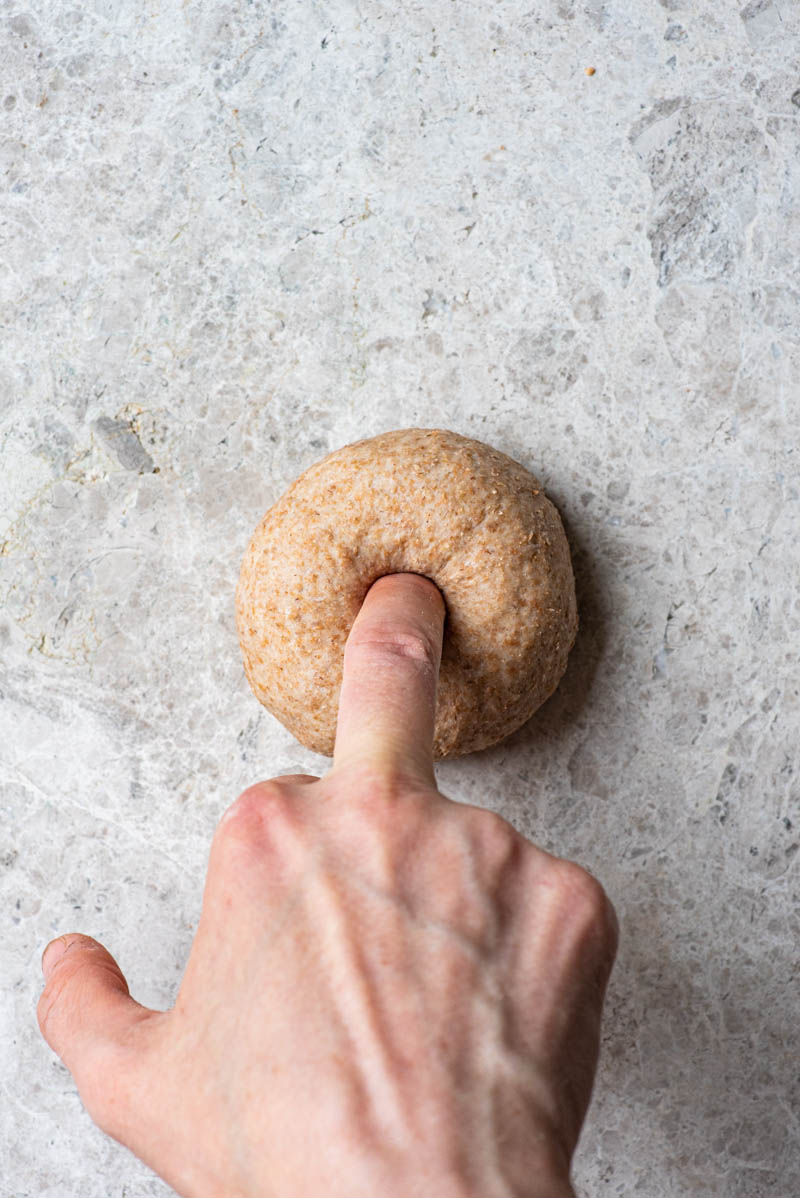
Poke a hole in the middle of the bagel. 
Use your fingers to spin, enlarging the hole. 
A ruler, for scale – the hole should be about half the size of the bagel. 
Set onto a baking sheet to prove. 
After a few hours, they should almost double in size. 
Cook the bagels in simmering water. 
They should visibly increase in size again. 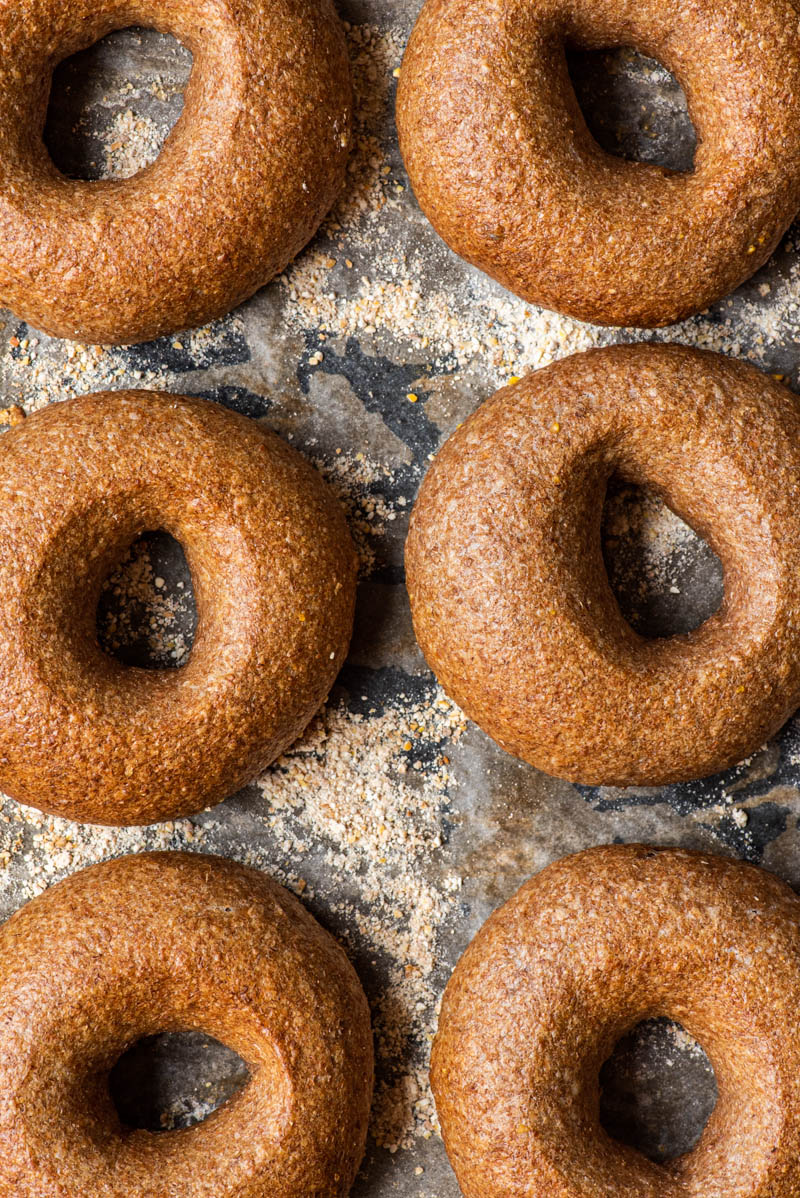
Bake for about 20 minutes.
Tips and Notes
Boiling is mandatory for bagels, and it’s what creates that thin chewy outer layer. The boiling time is given as a range, so keep an eye on your bagels – you’ll notice that they expand significantly in the hot water. Once they’ve stopped changing, you can take them out.
A slightly shorter boiling time is fine, but too long and you risk causing the bagels to rise less in the oven.
Baking soda is added to the water to make it more alkaline. It’s a substitute for the more dangerous lye, and adds a nice dark, chewy exterior crust to the bagels. Just a small amount makes a big difference.
Honey, molasses, or maple syrup is added to the water for a touch of sweetness, and also to increase the chewiness of the bagels.
This is a slightly higher hydration dough than our white-flour sourdough bagels, because whole wheat flour absorbs more water (this is why hydration percentages can be so tricky for beginners!). It’s deceptively soft if you’re using to making our other bagels, but don’t be fooled – the whole grains will absorb that liquid as it rests.
Make sure the water is at a constant simmer when boiling the bagels, and turn it up after adding them if needed to keep it consistent.
Unless you have a professional grade standing mixer, you’re better off kneading these by hand. A cheaper mixer might burn out the motor.
The Float Test
The proving time will vary, and this is why the float test is so important. If your bagels float after two hours in a warm house, great, time to refrigerate.
If your starter is a bit sluggish, or your house is chilly, the bagels might need a lot longer to prove. In the winter, it might be all day before they’re ready.
That being said, if your bagels don’t pass the float test, and you’re tired of waiting, you can try to refrigerate overnight as usual. They may rise a bit more in the fridge, and usually they turn out fine, if not perfect, if they didn’t quite float.
You can see in the process images above how much the bagels rise in the first proving period at room temperature. They don’t quite double, but it’s close. This is sourdough – be patient!
Why Refrigerate Before Cooking
The shaped bagels, once proved, are a little difficult to handle, and tend to lose their shape. Refrigeration makes them easier to move into the boiling water without stretching the dough, and improves the overall sourdough bagel taste.
It is possible to skip the long ferment in the refrigerator, after the bagels have proved at room temperature. This chilling period is to improve flavour, not necessarily for the bagels to rise any further. If you don’t care for that sourdough flavour, skip the refrigeration and go right to boiling.

Substitutions
If you don’t want to go all whole wheat, you can do half white and half whole wheat. Whole wheat bread flour can also be used.
Honey, molasses, and maple syrup can all be used interchangeably in this recipe, with slight changes in flavour. Use whichever you like the most. These are much easier to find than malt syrup, but it can be used if preferred.
Any type of active sourdough starter will work here. Ours are made with white flour for Baked, but whole wheat, rye, etc. are all fine, as long as it’s strong.
Use whatever toppings you like. Sesame seeds, herbs and spices (everything bagel spice), za’atar, anything you like.
More Whole Wheat Sourdough Recipes
100% Whole Wheat Sourdough Bread
Cinnamon Raisin Sourdough Bread
Sourdough Crackers
Sprouted Grain Sourdough Bread
Honey and Oat Spelt Sourdough

If you make this recipe, let us know by tagging @baked_theblog + #bakedtheblog on Instagram! We love to feel like we’re in the kitchen with you.
Recipe
100% Whole Wheat Sourdough Bagels
New York style whole wheat sourdough bagels, made with 100% whole wheat flour. These chewy, crispy bagels make the best wholesome breakfast.
Ingredients
- 315 grams water
- 200 grams active starter
- 30 grams honey or maple syrup
- 650 grams whole wheat flour
- 10 grams sea salt
- Flour for proving
- Toppings, as desired
For Boiling
- 1 tablespoon baking soda
- 1 tablespoon honey or brown sugar
Instructions
Day 1
- Add the water, starter, and honey or maple syrup to a large bowl (or the bowl of your standing mixer) and whisk until well combined.
- Add in the flour and salt, and stir until a shaggy dough forms. Turn the dough out onto a work surface and knead until smooth and pliable, about 10 minutes. Alternatively, transition to a dough hook and knead by machine.
- Shape the dough into a ball and return to the bowl. Cover the bowl with a towel and set aside to rest for 20 minutes.
- Once the dough has rested, take it out of the bowl and weigh it. The total weight should be about 1100 grams.
- Divide the dough into 10 equal pieces, weighing each piece to ensure accuracy.
- Shape each piece into a small ball by tucking the corners underneath, cupping the dough, and rolling it in a circular fashion on a clean, flour-free work surface. This helps to create surface tension and a skin on the ball.
- Cover dough balls and rest another 15 minutes. Line a baking sheet with parchment paper and sprinkle generously with flour or semolina. Note, if your baking sheets are small, you may need two.
- To shape the bagels: poke a hole with your finger directly through the centre of the dough ball. Insert both index fingers into the hole and roll fingers around each other to stretch out the centre (like a barrel roll) until it’s about the size of a walnut. Place on the lined baking sheet and repeat with the rest of the bagels.
- Cover the shaped bagels with a damp tea towel and let them prove at room temperature for 2.5-4.5 hours, or until puffy and about doubled in size. This could take more time, depending on the temperature in your house.
- Take a test bagel and place it in a dish full of cold water. If it floats, they’re done proving. Dry the test bagel off and return to the baking sheet. If it sinks, it still needs to prove longer.
- Once proved, cover the pan(s) with a damp tea towel, or beeswax wrap and refrigerate for 12-24 hours, or overnight.
Day Two
- Preheat the oven to 400°F (200°C). Place any toppings on flat plates, so they're ready to go.
- Bring a large pot of water to a rolling boil and add the baking soda and honey or brown sugar.
- Remove the bagels from the fridge and gently place them, 2-3 at a time, into the water. Boil for 20-30 seconds on each side.
- Remove boiled bagels with a slotted spoon to get rid of most of the water.
- Shake off excess water and immediately dip the top of the bagel into desired toppings. Set it back on the baking sheet. Repeat this process with the remaining bagels.
- Place the baking sheet into the centre of the oven.
- Bake for 18-22 minutes or until golden on top. Cool fully on a wire rack before slicing and serving or storing. Excess bagels freeze well - we recommend slicing them before freezing for easy toasting.
Notes
Boiling is mandatory for bagels, and it’s what creates that thin chewy outer layer. The boiling time is given as a range, so keep an eye on your bagels – you’ll notice that they expand significantly in the hot water. Once they’ve stopped changing, you can take them out.
A slightly shorter boiling time is fine, but too long and you risk causing the bagels to rise less in the oven.
Baking soda is added to the water to make it more alkaline. It’s a substitute for the more dangerous lye, and adds a nice dark, chewy exterior crust to the bagels. Just a small amount makes a big difference.
Honey, molasses, or maple syrup is added to the water for a touch of sweetness, and also to increase the chewiness of the bagels.
This is a slightly higher hydration dough than our white-flour sourdough bagels, because whole wheat flour absorbs more water (this is why hydration percentages can be so tricky for beginners!). It’s deceptively soft if you’re using to making our other bagels, but don’t be fooled – the whole grains will absorb that liquid as it rests.
Make sure the water is at a constant simmer when boiling the bagels, and turn it up after adding them if needed to keep it consistent.
Unless you have a professional grade standing mixer, you’re better off kneading these by hand. A cheaper mixer might burn out the motor.
The Float Test
The proving time will vary, and this is why the float test is so important. If your bagels float after two hours in a warm house, great, time to refrigerate.
If your starter is a bit sluggish, or your house is chilly, the bagels might need a lot longer to prove. In the winter, it might be all day before they’re ready.
That being said, if your bagels don’t pass the float test, and you’re tired of waiting, you can try to refrigerate overnight as usual. They may rise a bit more in the fridge, and usually they turn out fine, if not perfect, if they didn’t quite float.
You can see in the process images above how much the bagels rise in the first proving period at room temperature. They don’t quite double, but it’s close. This is sourdough – be patient!
Why Refrigerate Before Cooking
The shaped bagels, once proved, are a little difficult to handle, and tend to lose their shape. Refrigeration makes them easier to move into the boiling water without stretching the dough, and improves the overall sourdough bagel taste.
It is possible to skip the long ferment in the refrigerator, after the bagels have proved at room temperature. This chilling period is to improve flavour, not necessarily for the bagels to rise any further. If you don’t care for that sourdough flavour, skip the refrigeration and go right to boiling.
Nutrition Information:
Yield:
10Serving Size:
1Amount Per Serving: Calories: 288Total Fat: 2gSaturated Fat: 0gTrans Fat: 0gUnsaturated Fat: 1gCholesterol: 0mgSodium: 768mgCarbohydrates: 62gFiber: 7gSugar: 6gProtein: 10g
This is an approximation of the nutrition offered in this recipe, and is created using a nutrition calculator.
The post 100% Whole Wheat Sourdough Bagels appeared first on Baked.