

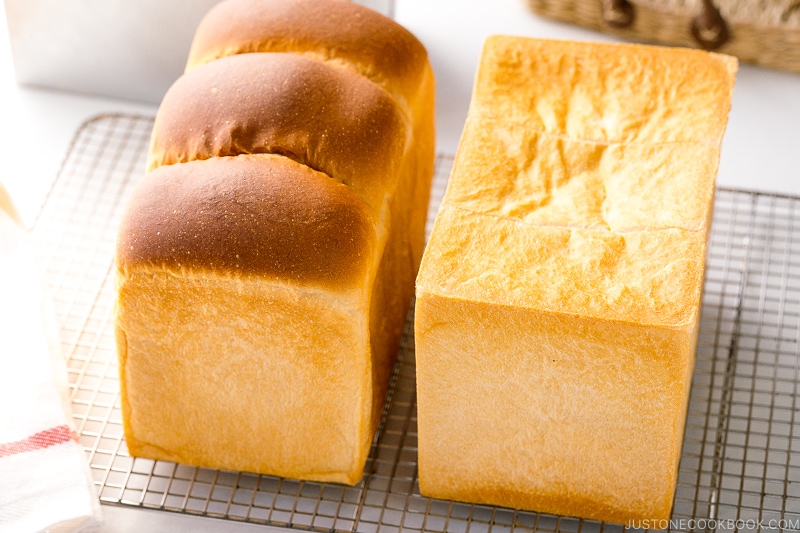
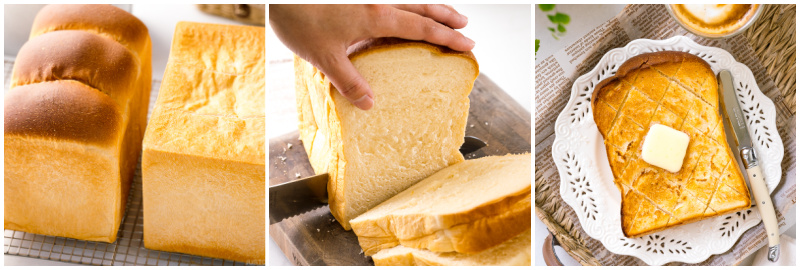
Soft and light as a cloud and fluffy as cotton, Japanese Milk Bread is the most tender and moist Pullman loaf bread you’ll find. Also known as Shokupan, it’s enjoyed daily in Japan as breakfast toast and sandwich bread. This recipe shows two styles: A loaf with a rounded top and one with a flat top.
Servings: 1 loaf
Ingredients
For 1 Rectangular Shokupan Loaf (1.5 kin (斤) size)
- ▢ 250 g warm water (104ºF or 40ºC)
- ▢ 20 g sugar
- ▢ 7 g instant yeast (I use Fleischmann’s®bread machine yeast; 1 package of yeast (all types) weighs 7 g; make sure to use all the granules; to substitute active dry for instant yeast, use 25% more active dry; proof active yeast by dissolving it in the warm water from the recipe first until many small bubbles appear)
- ▢ 7 g kosher salt (Diamond Crystal; use half for table salt)
- ▢ 10 g honey
- ▢ 350 g bread flour (King Arthur)
- ▢ 20 g skim milk powder or nonfat dry milk powder (Bob’s Red Mill)
- ▢ 25 g unsalted butter (room temperature)
For Greasing
- ▢ ½ tsp neutral-flavored oil (vegetable, rice bran, canola, etc.) (for greasing the bowl)
- ▢ 10 g unsalted butter (room temperature; for greasing the pan; you can use cooking oil spray, but I like the taste of butter around the crust)
For 1 Square Shokupan Loaf (1 kin (斤) size)
- ▢ 167 g warm water
- ▢ 14 g sugar
- ▢ 4.7 g instant yeast
- ▢ 4.5 g kosher salt (Diamond Crystal; use half for table salt)
- ▢ 7 g honey
- ▢ 235 g bread flour
- ▢ 14 g skim milk powder or nonfat dry milk powder
- ▢ 17 g unsalted butter
Japanese Ingredient Substitution: If you want substitutes for Japanese condiments and ingredients, click here.
Instructions
Before You Start
-
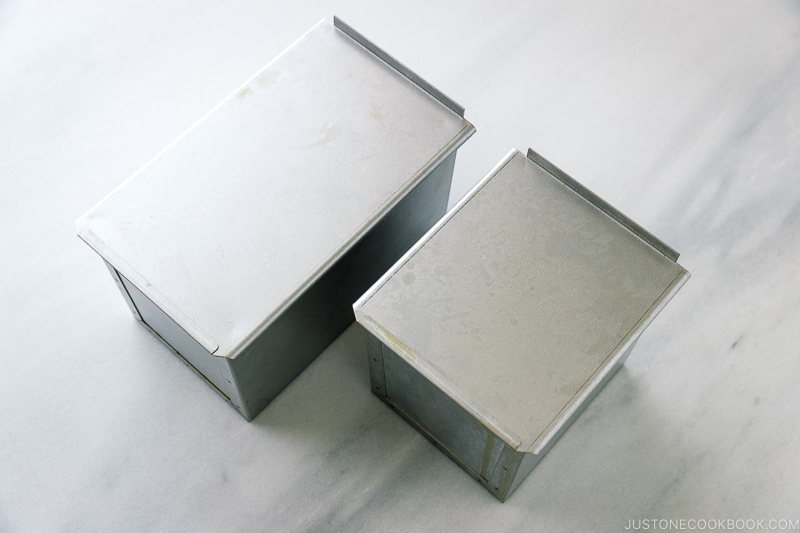
Shokupan Loaf Pans: The rectangular loaf pan is 4.7 in. x 7.8 in. x 5.1 in. (12 cm x 20 cm x 13 cm) and can hold 3100 ml. The square loaf pan is 4.7 in. x 5.3 in. x 5.1 in. (12 cm × 13.5 cm × 13 cm) and can hold 2070 ml. I have written an extensive post about Japanese loaf pans and how to order them from Japan. If you’re not particular about the size and shape, you can use this 1 lb loaf pan on Amazon and follow the recipe for the rectangular loaf.
-
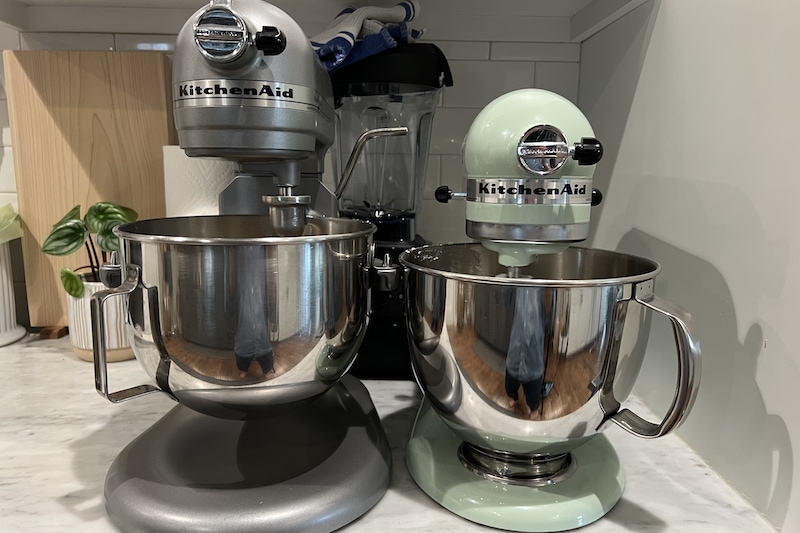
Stand Mixer: Please note that my instructions below are for a KitchenAid 5-QT Artisan Series stand mixer (325 watts). If you’re using a KitchenAid Classic Series mixer, do not double the recipe as the 275-watt motor is not strong enough. If you’re using a KitchenAid Professional Series mixer with a spiral hook, you must double the rectangular loaf recipe to succeed, as there won’t be enough dough to engage the hook otherwise. With twice the dough, you must knead 1½ times longer at each step (as noted in the instructions). If you have a different brand of stand mixer, follow my steps the best you can to achieve a dough with the correct texture that passes the windowpane test. Please see the blog post for more details.
- Hand Kneading: I hope this video is helpful for the kneading technique to use.
-
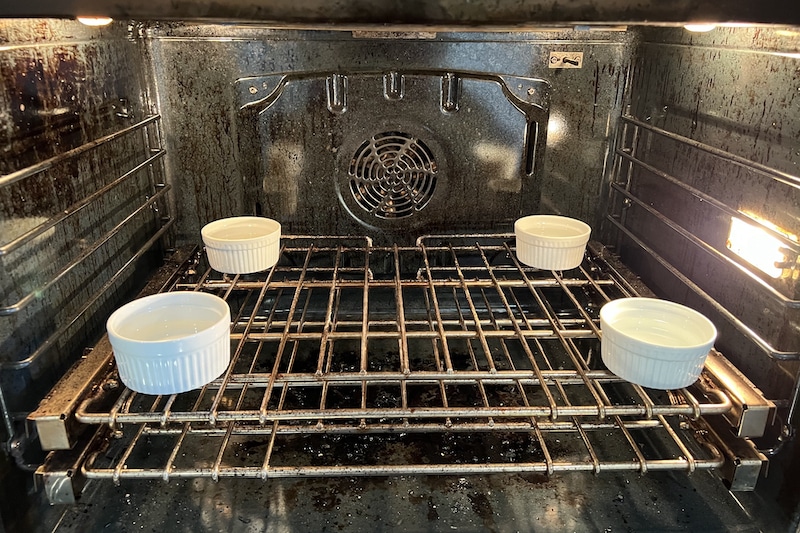
To Create a Warm Environment for Bulk Fermentation: If your oven has a Proof setting, turn it to 100ºF (38ºC). Tip: If your oven doesn’t have a Proof setting, place small baking dishes of boiling water at the four corners on the lower-middle rack. Then, place your dough in a bowl in the center of the rack and close the door. The steam and heat from the boiling water will create a warm environment for bulk fermentation. There is plenty of online information on different ways to proof bread dough, such as using an Instant Pot (use the Yogurt function on Low or use the temperature setting).
To Make the Dough
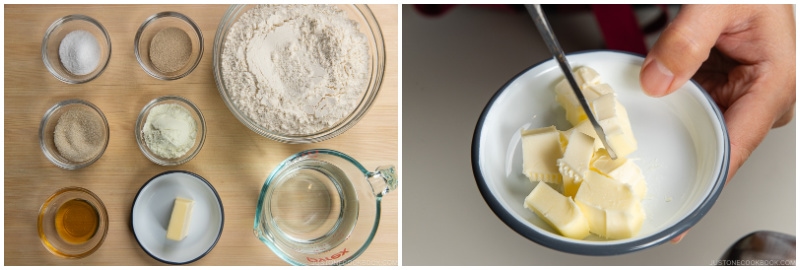
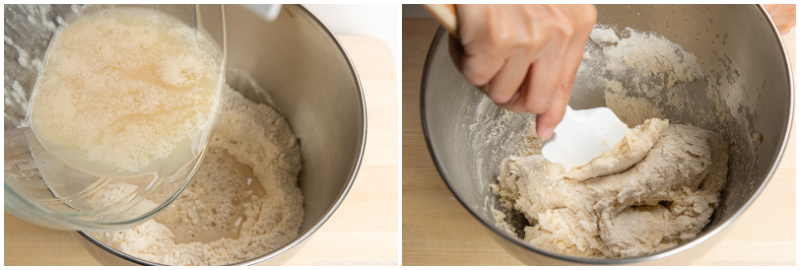
- Gather all the ingredients. Cut the butter into small cubes (I used a pair of scissors). Precise measurement is extremely important for this recipe; therefore, please weigh your ingredients with a digital kitchen scale. I strongly discourage measuring by volume.
- In a large bowl, combine the warm water, sugar, yeast, honey, and salt.
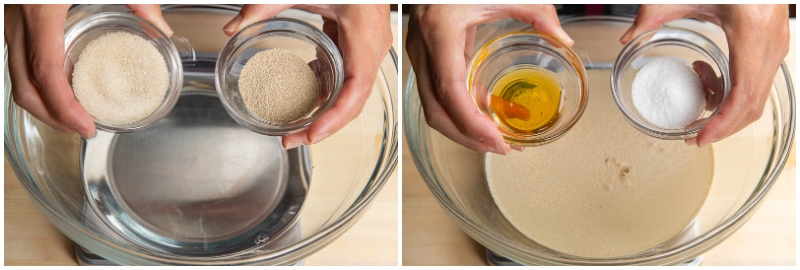
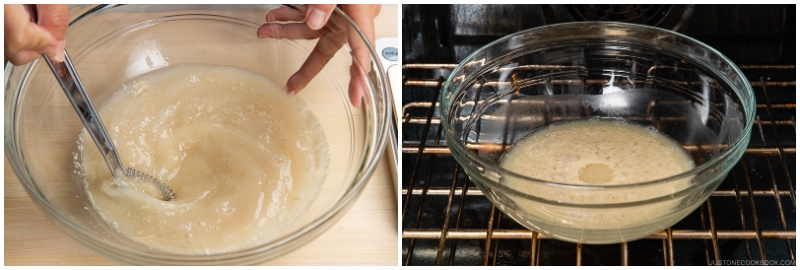
- Whisk it all together and set aside in a warm place for 10 minutes. You want to see bubbly foam on the surface. If you don’t see any, maybe your yeast is old or the environment is not warm enough; wait another 5 minutes to see if any bubbles develop.
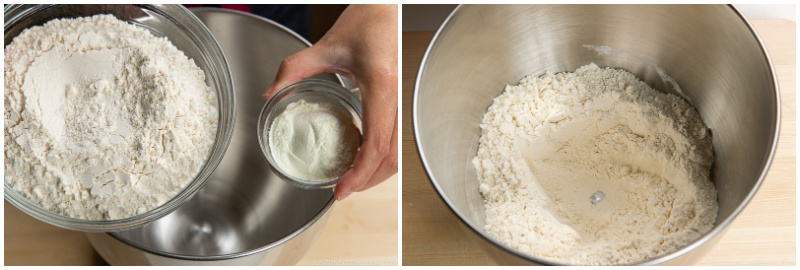
- Meanwhile, combine the bread flour and skim or nonfat dry milk powder in a stand mixer bowl. Mix it together and make a well in the middle of the flour mixture.
- Once you confirm the foamy surface on the yeast mixture, pour it into the well of the flour mixture, scraping every bit of the liquid with a silicone spatula or dough scraper. Then, mix it until combined. Keep this yeast mixture bowl, as you’ll be putting the dough ball in it later.
To Knead the Dough in the Stand Mixer
- Warning: KitchenAid does not recommend kneading dough at settings higher than Speed 2. However, we can’t achieve a perfect texture without kneading aggressively. Hold your stand mixer down with your hand(s) when you’re kneading at Speed 6, and keep an eye on it at all times. Do not walk away. Don’t take this warning lightly, as my instructor’s mixer fell off the countertop onto the kitchen floor twice when she stepped away for just a few seconds. Please use it at your own discretion.
- Set up the stand mixer with a dough hook attachment. Knead the dough on Speed 2 for 2 minutes (or 3 minutes if making double the rectangular loaf recipe using the Professional Series mixer). This is just to get started. The ingredients should be well combined after this step.
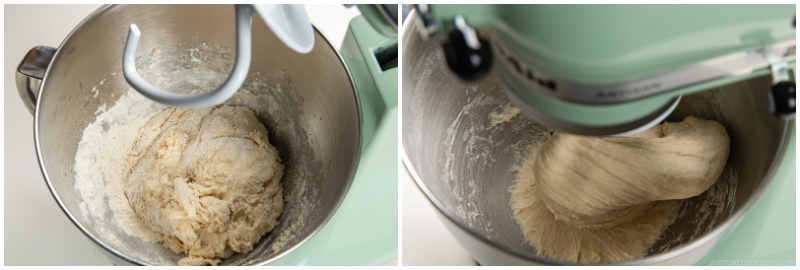
- Next, increase the speed and knead the dough on Speed 4 for 4 minutes (6 minutes for double). After 4 (or 6) minutes, stop the mixer. The dough will be smoother than before, yet it should still look a bit rough and bumpy.
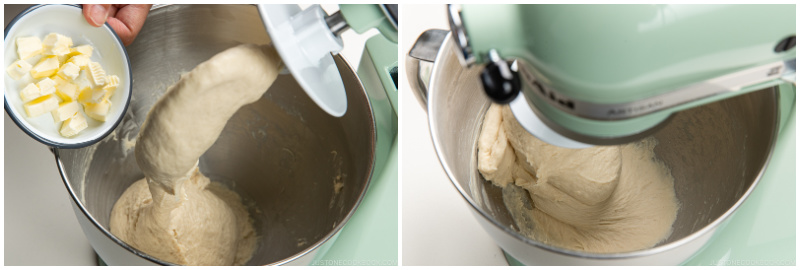
- Add the butter cubes to the dough. Knead the dough again on Speed 2 for 2 minutes (3 minutes for double), or until you can no longer see any streaks of butter.
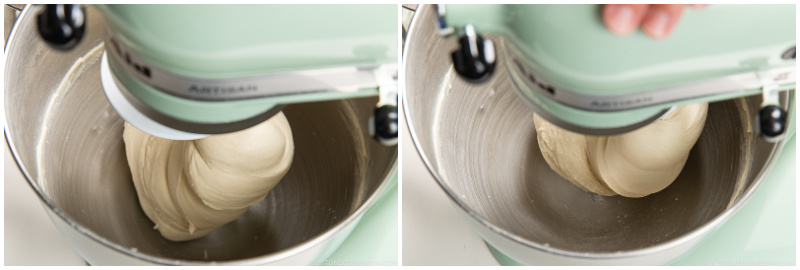
- Then, knead the dough on Speed 4 for 4 minutes (6 minutes for double). While spinning, the dough will stretch and elongate (see the photo below).
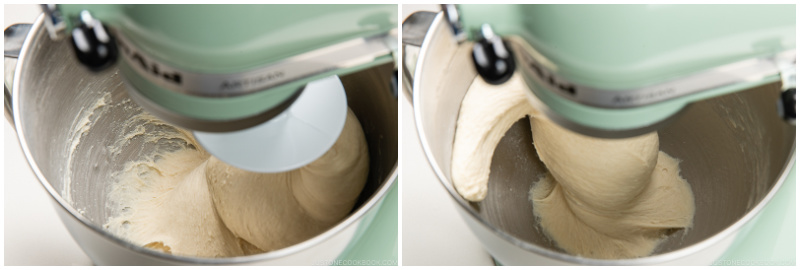
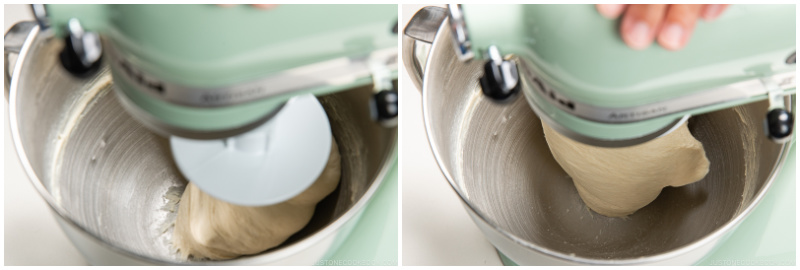
- Stop the mixer and check the texture of the dough. It should be a lot smoother, shinier, softer, and thinner when it’s stretched. At this stage, the dough is still attached to the bottom of the mixer bowl.
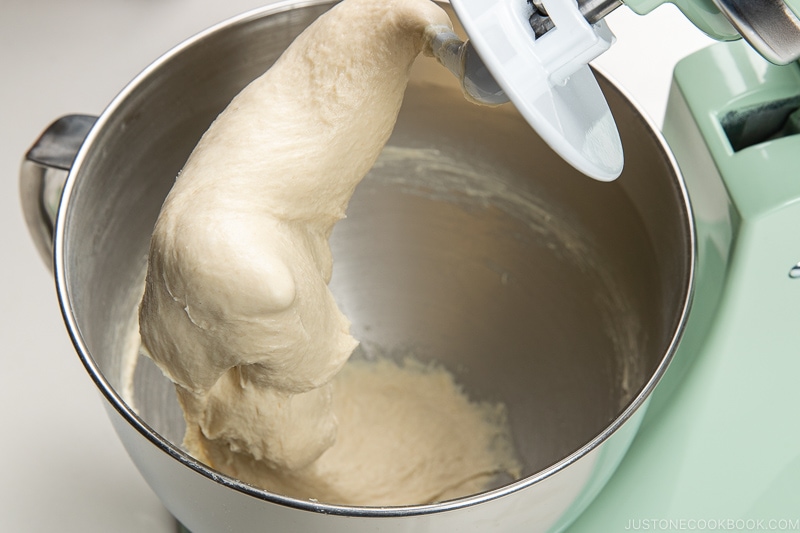
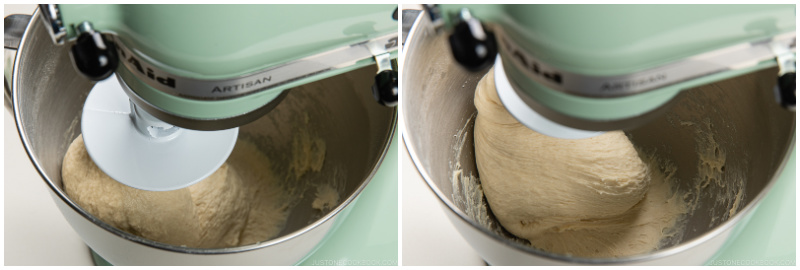
- Now, knead the dough on Speed 6 for 3 minutes (4½ minutes for double). From here, you MUST hold down your stand mixer with your hand(s) since the machine will shake and move, and it could possibly fall off the countertop onto the floor.
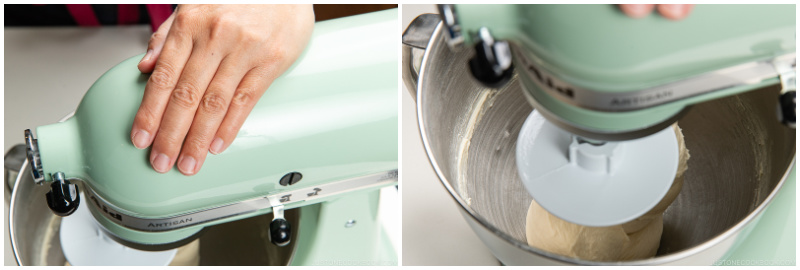
- At this stage, the dough will start pulling away from the bottom of the bowl and eventually become a solid ball shape. The mixer will shake and wobble as the dough bangs around the sides of the bowl. Again, hold your stand mixer to keep it from falling and monitor it at all times.
- Japanese milk bread requires aggressive kneading to get that soft, tender texture. The goal here is to develop the gluten (elasticity) by lengthening and stretching the gluten strands in the dough.
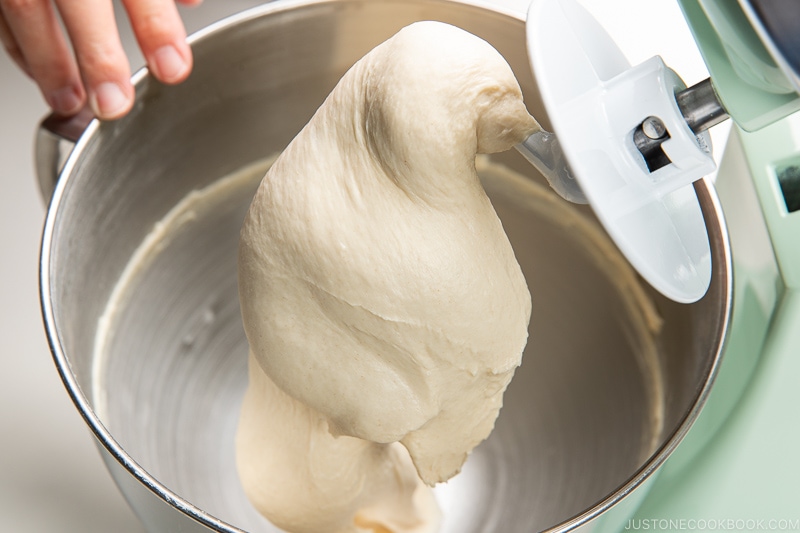
- After kneading on Speed 6, stop the mixer. The dough should look really silky, shiny, soft, and smooth (not sticky). When you lift the dough hook, it should pick up all the dough in one piece, separating easily from the bottom of the bowl.
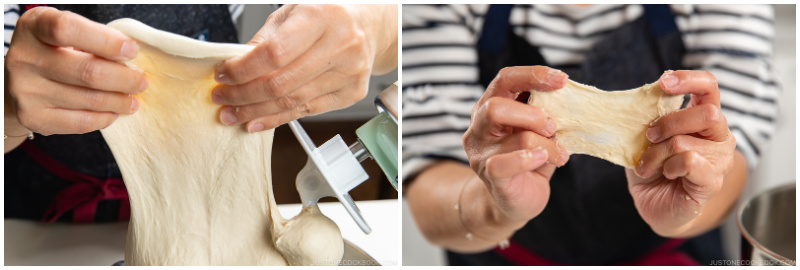
The Windowpane Test
- Now, it’s time for the windowpane test. Either pull on a part of the dough or tear off a small piece. Hold the dough in both hands and gently pull it into a square with your fingers. If it stretches without tearing to a super-thin membrane with light able to pass through the center, your dough passes the test. If it doesn’t stretch or it tears too easily, knead it again on Speed 6 for 1-2 minutes and test again.
To Slam and Fold
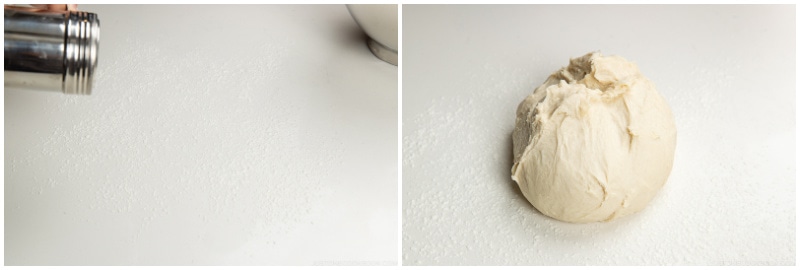
- Once your dough passed the windowpane test, lightly dust the work surface and your hands with flour to prevent sticking. Scrape the dough from the bowl with the silicone spatula or dough scraper and place it on the work surface. From this point, make sure to keep one smooth surface on your dough ball at all times. My nice smooth surface is currently on the bottom of the dough.
- Now, pick up the dough ball, keeping the smooth side up. Then, slam the smooth side onto the work surface. Bang!
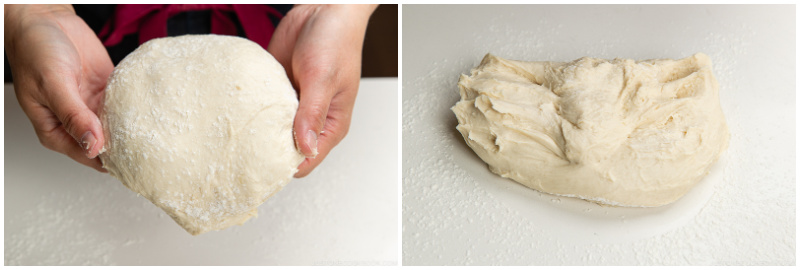
- Then, hold one edge of the dough with your fingers in the 12 o’clock position and fold it over to the other side at the 6 o’clock position, revealing the smooth surface. Now, pick up the dough with the smooth side up.
- Once again, slam the smooth surface of the dough onto the work surface. Bang! Now, pick up the edge of the dough at the 9 o’clock position and fold it over to the opposite side at the 3 o’clock position, revealing the smooth surface. Again, pick up the dough with the smooth side up.
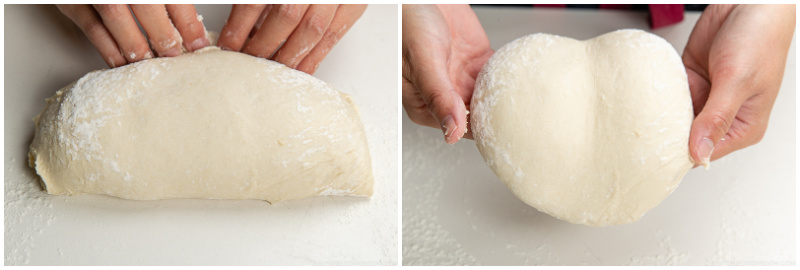
- Repeat this “slam and fold” process 5 times in total. After you slam the dough for the final time, leave the dough on the work surface temporarily, and don’t fold it over yet.
- Take the bowl that you mixed the yeast in and thinly coat it with neutral-flavored oil. Wipe off any excess oil from the bowl and your oily fingers with a paper towel. We do not want a pool of oil in the bowl.
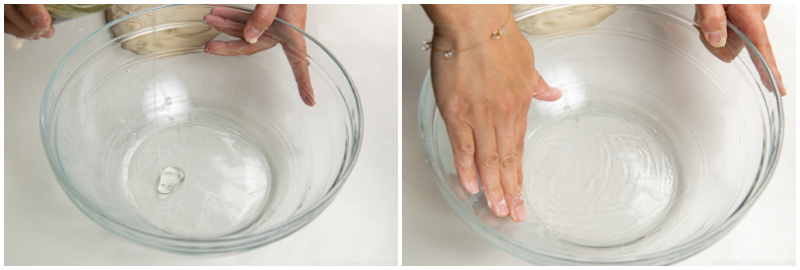
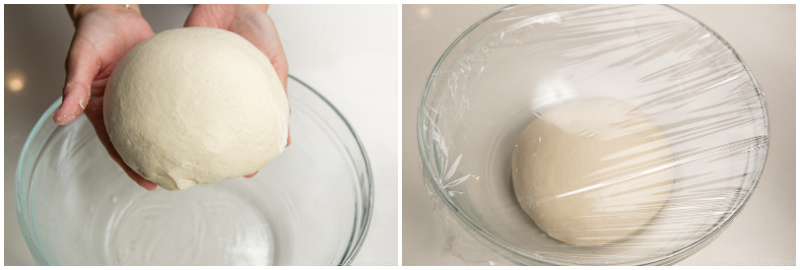
- Finally, go back to the dough and fold it over one last time. Pick it up and pull the edges of the dough from all sides to create a smooth, taut skin. Tuck and pinch the edges underneath to hide them at the bottom. Put the dough ball in the bowl and cover it with plastic.
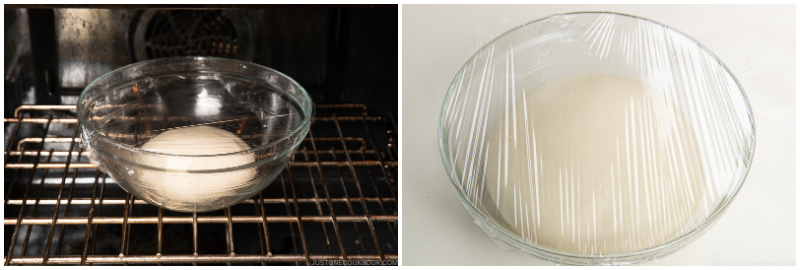
The First Rise (Bulk Fermentation)
- Let the dough rise for 40 minutes. The dough will become 3 times bigger in size. If you live in a cooler climate, it may take longer (1-1½ hours). I use the Proof setting on my oven at 100ºF (38ºC). Please see the “Before You Start” section of the recipe for my proofing tips.
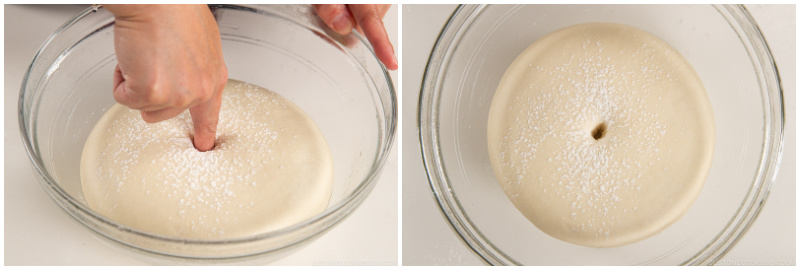
To Use the Finger Test
- Once the dough has tripled in size, dust some flour on top and use your index finger to poke the middle of the dough. If the hole does not close up, it’s ready. If the dough closes up immediately, proof the dough a little longer.
To Punch Down the Dough
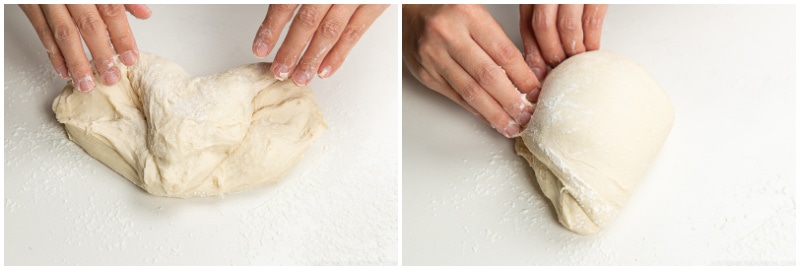
- Uncover and invert the dough bowl to release the dough onto your work surface. Using your fingers, gently press down and deflate the dough. Remember to keep one smooth surface on your dough at all times. My smooth surface is currently on the bottom of the dough.
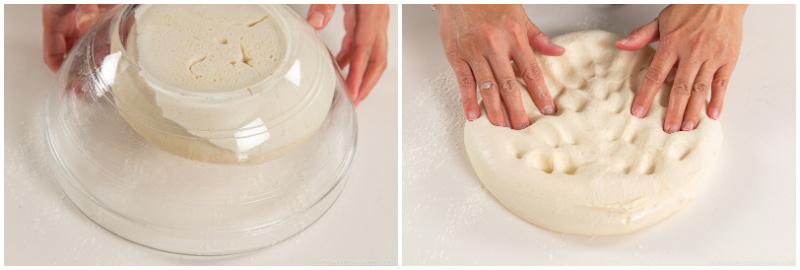
- Collect and press all the edges into the middle, flip the dough, and form a round shape, tucking any loose edges underneath.
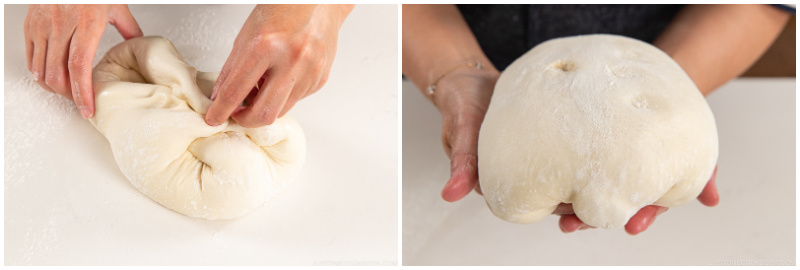
To Divide the Dough
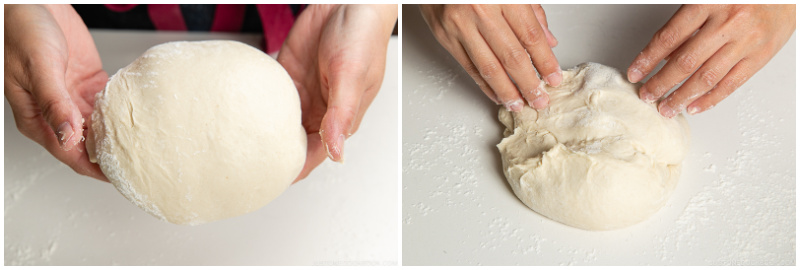
- Using a kitchen scale, weigh the dough. Then, divide it into 3 equal pieces with the dough scraper. For a square shokupan loaf, divide it into 2 equal pieces.
- If you have a piece that’s bigger than the others, tear off some dough from the edge, keeping its smooth surface intact. Attach the torn dough to the edge of a piece that’s smaller than the others.
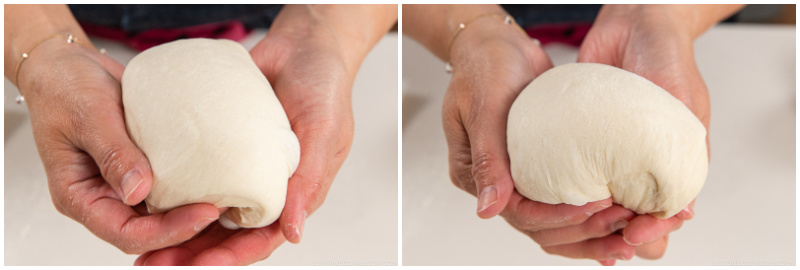
- Form each piece into a ball with a smooth, taut skin: Hold the dough with the smooth surface on top. Gently pull and tighten the dough down from all sides to create tension on the outside. We want all three dough balls to rise equally, so limit the pulling action to roughly the same for each ball, about 3-4 times total. Tuck and pinch the loose dough at the bottom. Place the dough on the work surface and repeat this process for the rest of pieces. Alternatively, you can place the dough on a non-floured surface. Place both of your hands behind the dough and drag the dough ball along the surface toward your body. The bottom of the dough sticks to the dry surface, creating tension and tightening the ball. Keep the dough ball upright and don’t allow the top of the dough to roll over as you pull (see this video). Rotate the ball a quarter turn and perform another gentle drag toward your body. Continue rotating and dragging a few more times until the dough is sufficiently taut and uniformly round.
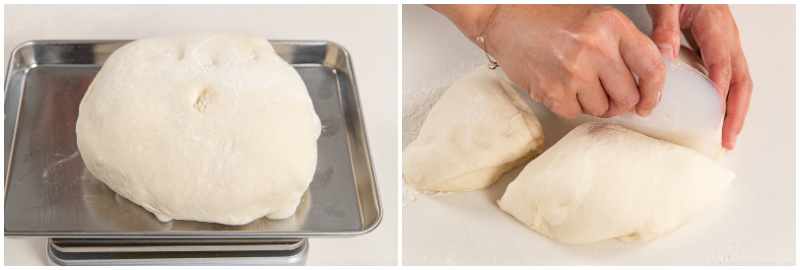
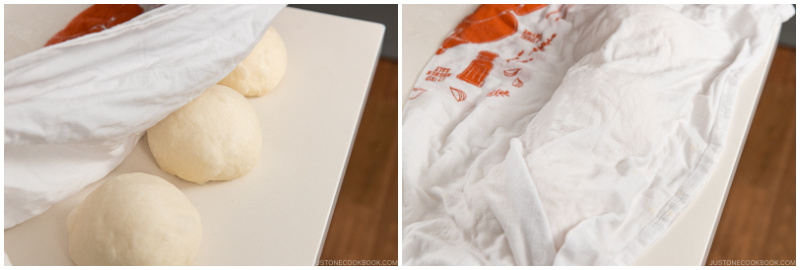
The Bench Rest
- Cover the dough balls with a damp towel and rest the dough for 15 minutes.
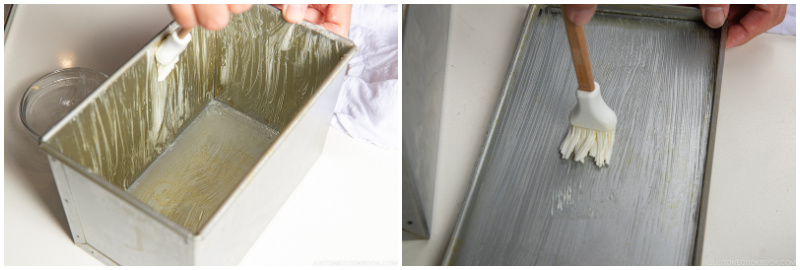
- Meanwhile, grease the pan (and the lid, if you’re making flat-topped shokupan) with butter (or cooking oil spray).
To Shape the Dough
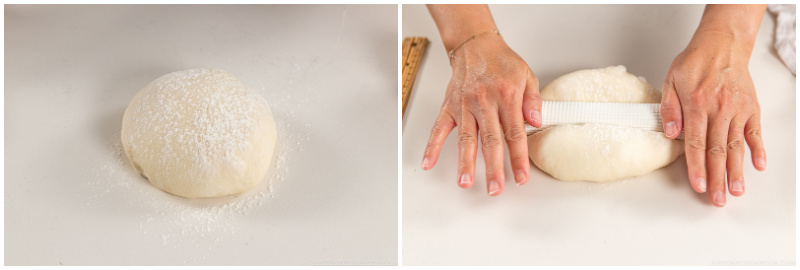
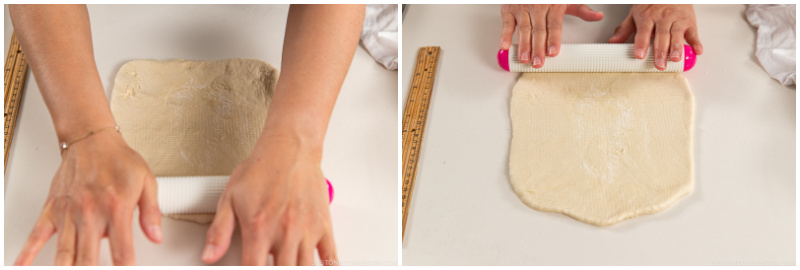
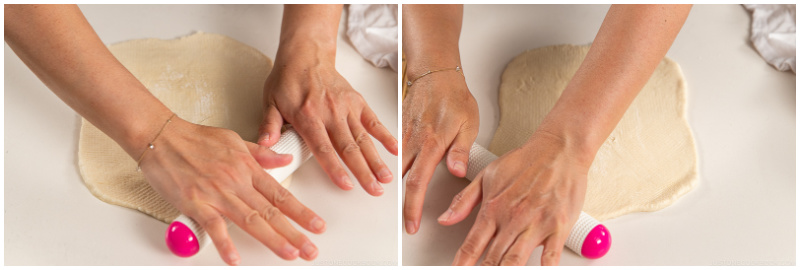
- After 15 minutes, take out one dough ball, keeping the rest under the damp towel. DO NOT dust any flour on the work surface for this step. Dust only enough flour on the dough ball (very minimal) to keep the rolling pin from sticking. Next, place the rolling pin in the middle of the dough and press it down. Tip: I learned that it’s harder to roll out the dough into a rectangular shape if the work surface is dusted with flour or you sprinkle too much flour on the dough. The dough will slide around when you’re trying to roll it out.
- First, roll out the dough away from you, rolling all the way through the top edge. Next, roll out the dough toward you, rolling through the edge closest to you.
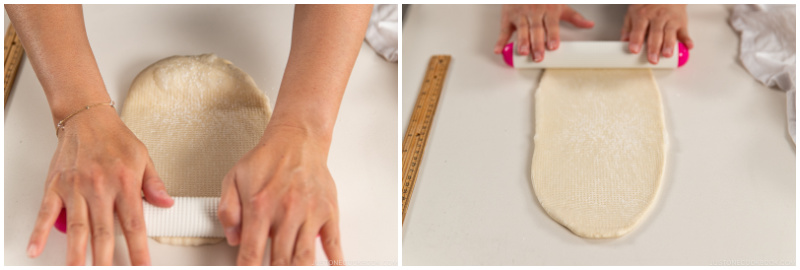
- Pick up the dough and flip it over, and then rotate it 90 degrees. It’s now laid out in front of you in a horizontal oval shape.
- Press the four corners of the dough to shape the oval into a rectangle. Place the rolling pin in the middle.
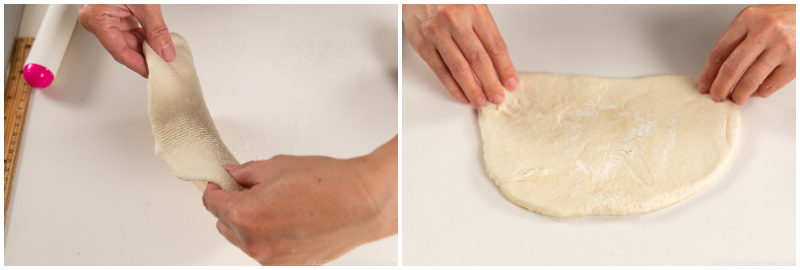
- Roll out the dough away from you and then toward you, rolling through all the edges.
- Next, roll out the upper two corners, so they are squared rather than rounded.
- Then, roll out the lower two corners. The dough now should look like a vertical rectangle.
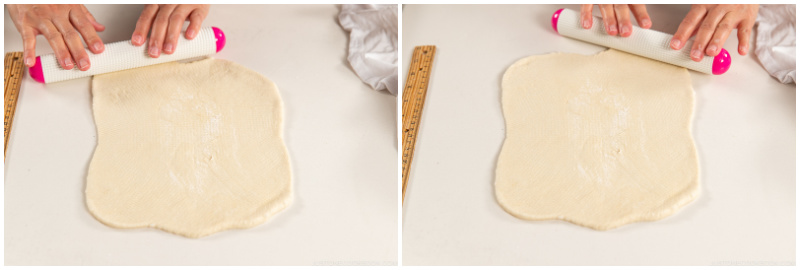
- Make sure the dough is an even thickness from the center to the edges. If the edges are slightly thick, gently press them down with your fingers and palm. The rectangle should be roughly 21 cm x 26 cm (8 in. x 10 in.). Tip: I noticed from my own experience that if I don’t roll out the dough evenly at this stage, it affects the shape when I roll up the dough later.
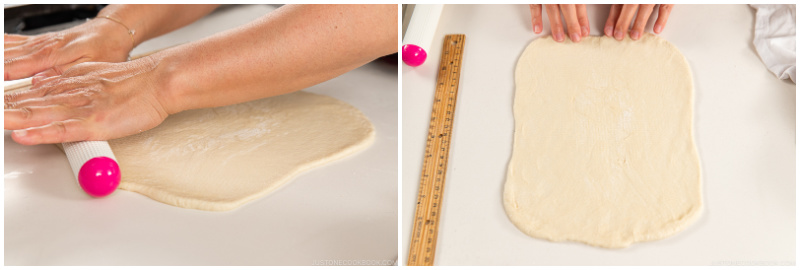
- Fold the dough in thirds, starting with the right third. Bring the dough to the left one-third line, lightly and gently pressing the edge down so it stays in place. Next, fold the left third of the dough, overlapping the edge of the right third by two-thirds. The edge of the left third should be slightly past the center line.
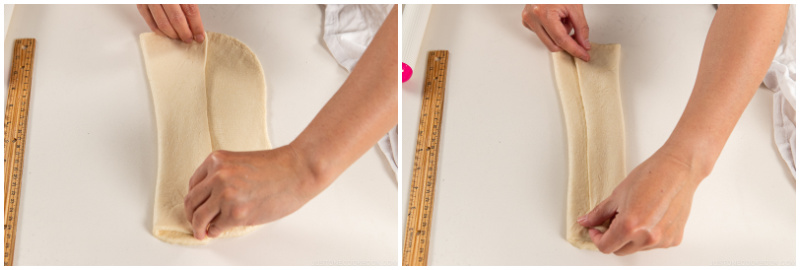
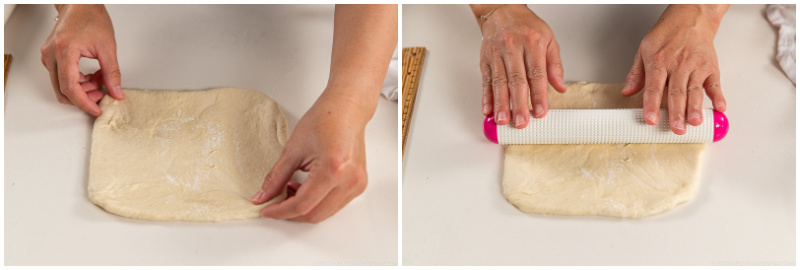
- Press down and seal this edge with your fingers, from top to bottom. At this stage, the folded dough should have an even thickness. Both the right and left horizontal edges are thicker (puffed up), but the overlapped edges along the center line even out the thickness of the dough.
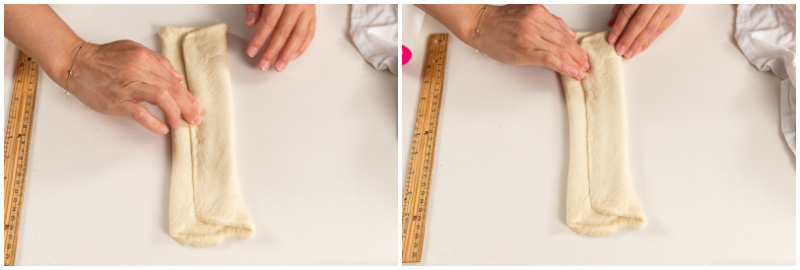
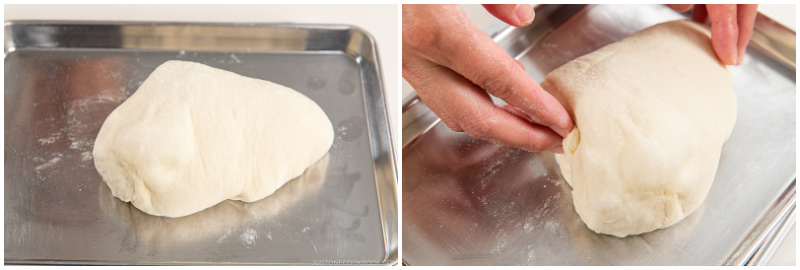
- Fold down the two upper corners toward the center line, so the top now looks like a triangle tip. Then, tuck the tip down toward you.
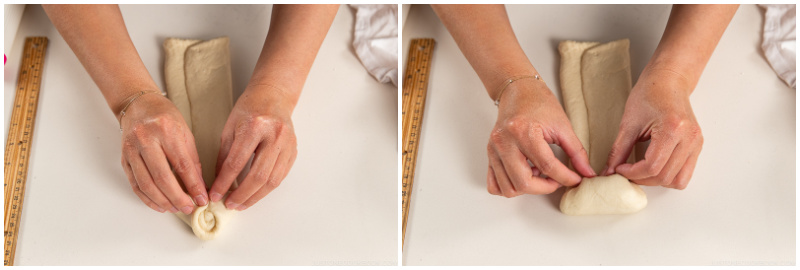
- Start rolling the dough slowly toward you, gently pulling the dough downward as you roll to create a smooth, taut skin, but don’t roll too tightly.
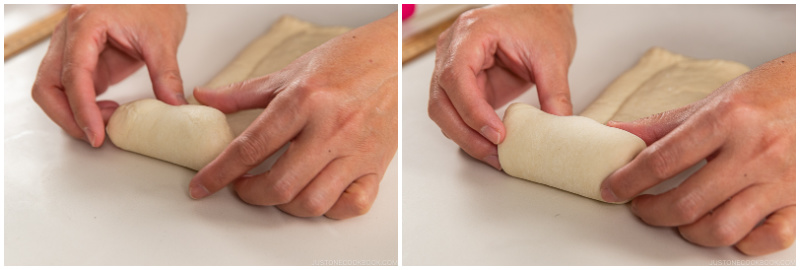
- Keep rolling all the way to the end, making sure the shape of the roll is even. Now, pinch the dough at the edge to seal. Keep the rolled-up dough under the damp towel and repeat this process with the rest of the dough balls. Remember which piece of dough you rolled last.
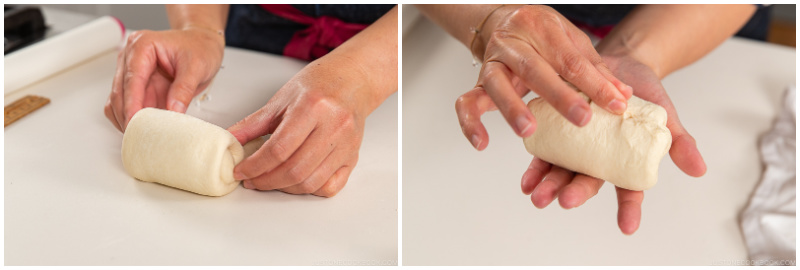
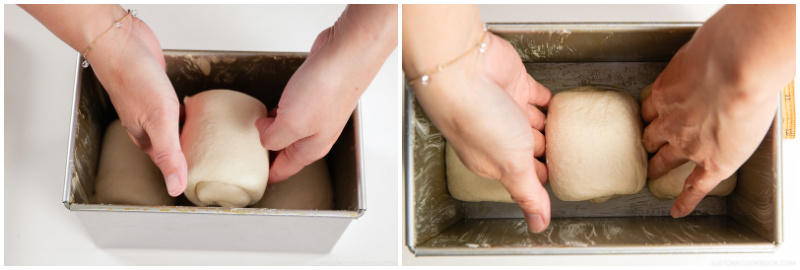
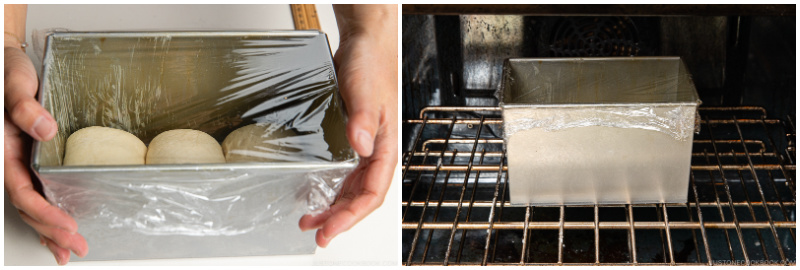
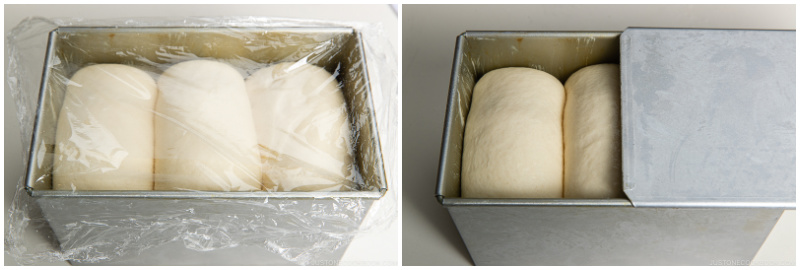
- Now, place the dough rolls in the shokupan mold, starting with the first two pieces you rolled. Place the first dough roll, seam side down, on one side of the mold. Make sure that 1) the seam is on the bottom, 2) the direction of the swirl goes toward (and not away from) the middle of the pan, and 3) the rolled edge touches the pan’s side.
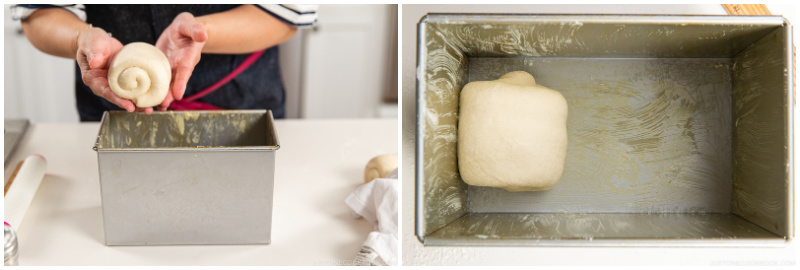
- Now, place the second dough roll on the opposite end of the mold, seam side down. Again, the direction of the swirl should go toward the loaf’s center.
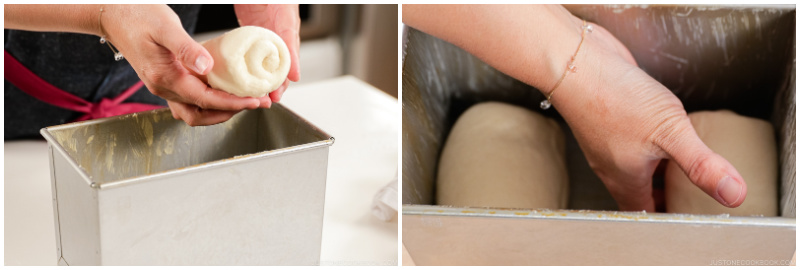
- Finally, place the last piece of dough you rolled between the first two, seam side down. The direction of the swirl can go either way.
- If you are using the square shokupan loaf pan, two rolls should go in just like the rectangular loaf pan (without the middle rolled dough).
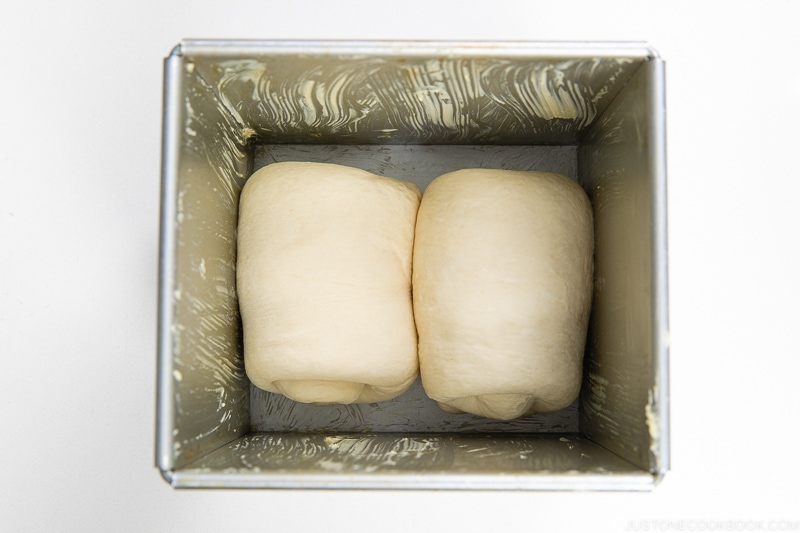
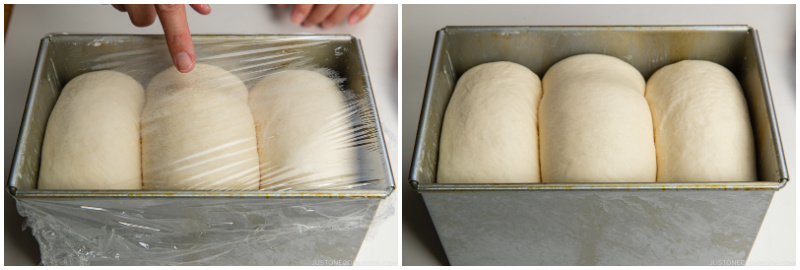
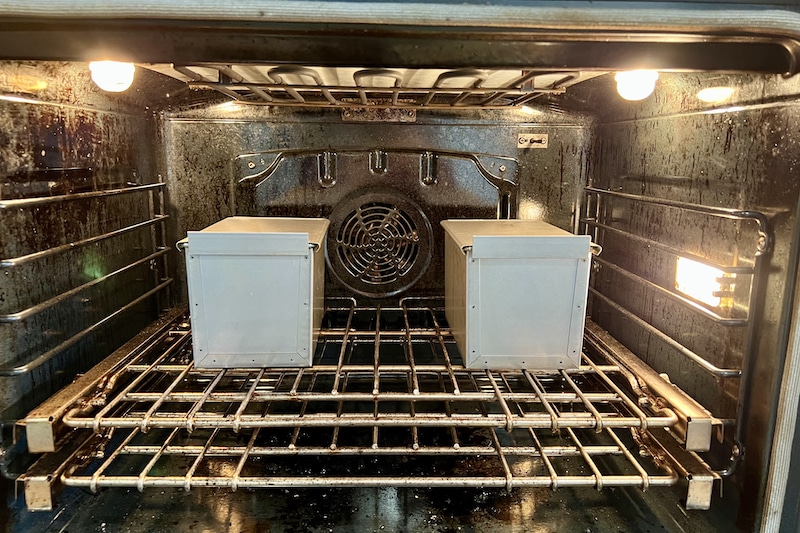
The Final Rise (Proofing) and Oven Preheat
- Cover the mold with plastic and place in a warm environment for 1 hour or until the dough has risen to 80-90% of the height of the mold (see the next step). Tip: For the first 30 minutes, I use the Proof mode of my oven. I then take out the mold and place it in a warm area in the house to finish proofing.When you have 30 minutes of proofing time left, start preheating the oven to 425ºF (220ºC). Tip: My oven usually preheats in 15 minutes; however, it is very important that the oven is thoroughly preheated, so I plan 30 minutes of preheating time.
-
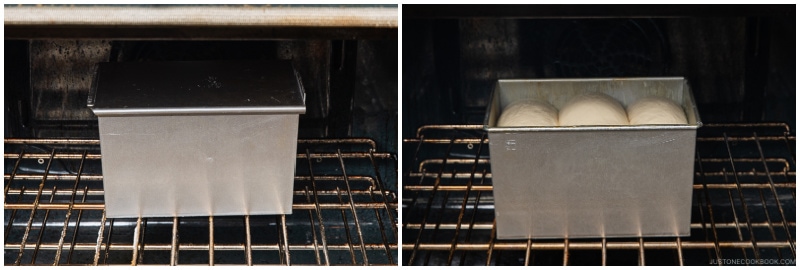
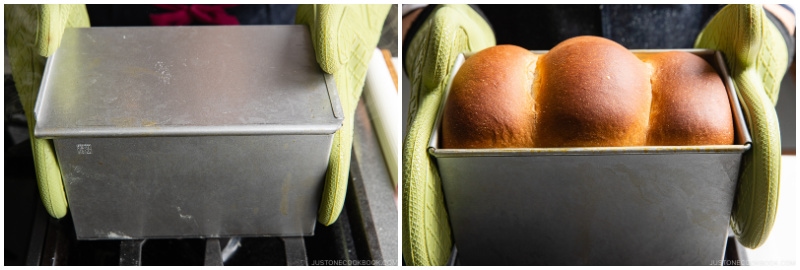
To make a flat-topped shokupan (角型食パン), let the dough rise to 75-80% of the height of the mold. Then, remove the plastic and close the lid. If your proof was a bit too long and you exceed 80%, change to a round-topped shokupan. Tip: Don’t force the lid closed on the dough. Even if the lid closes, the dough will continue to rise in the oven and the lid will get stuck.
-
To make a round-topped shokupan (山型食パン), let the dough rise to 85-90% of the height of the mold. When the highest point of the dough touches the plastic wrap, it’s ready to bake. Now, remove the plastic and spray the surface of the dough with water (I use this mister). Note: The volume for each shokupan mold is very different. My 90% may not be the same as yours if we use a different mold.
To Bake the Bread
- Set the oven rack to the lower-middle position so there’s enough space for the bread to rise during baking, especially if you plan to make a round-topped milk bread. For the flat-topped shokupan, bake at 415ºF (210ºC) for 25-30 minutes (in my oven, it’s 28 minutes). For the round-topped shokupan, bake at 385ºF (195ºC) for 30 minutes. Note that I lower the oven temperature (from the preheating temperature). For a square loaf, the baking temperature and time should be the same or slightly less.
- If you are baking two loaves at the same time, bake 1-2 minutes longer and make sure to have plenty of space between the pans so heat can circulate.
- When it’s done baking, drop the mold 1-2 times on the work surface (I use a grate on the stovetop) to prevent the shokupan from shrinking. This will let the water vapor in the bread escape. Tip: If water vapor remains in the bread, it will weaken the bread’s structure and make it easier to deflate. The sides of the loaf will wilt and bend as well.
-
For the flat-topped shokupan, open the lid carefully. If you struggle to remove the lid, close it and drop the shokupan mold one more time. If you still can’t open it, note that you need to stop the second proof earlier next time. Maybe instead of 80%, try 75%.
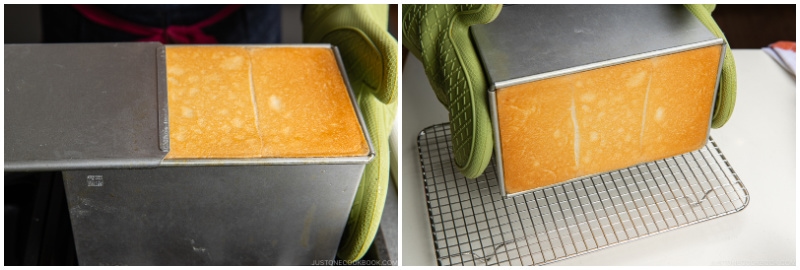
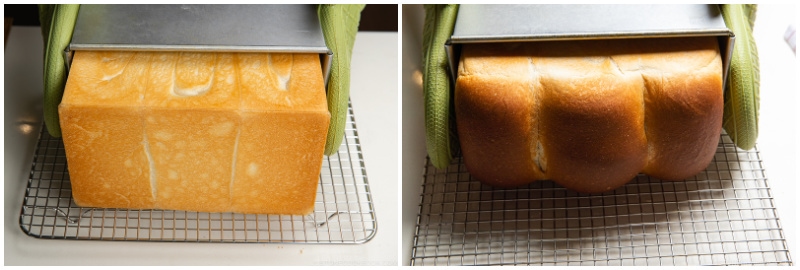
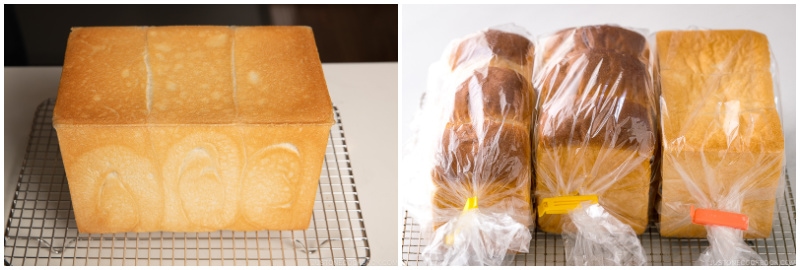
- Give a few thrusts and let the shokupan slide out of the mold onto a wire rack. After baking, do not wash your Japanese shokupan loaf pan. Simply wipe it off with a paper towel and store it completely dry to prevent rust.
To Serve
- Let the shokupan cool completely on the wire rack; it may take 2 hours. Do not cut or open the loaf while it’s hot; the steam will escape and the bread will lose moisture. Slice the bread and toast it to enjoy with butter and jam or use untoasted slices for Japanese-style sandwiches.
To Store
- If you plan to eat the shokupan within 1 to 2 days, put the whole loaf, completely cooled, in a bag and slice as needed. If you don’t consume the shokupan within 2 days, slice and freeze the rest for a month to preserve its quality. If you don’t plan to eat the shokupan within the next 2 days, slice and freeze it.
Equipment
- KitchenAid Stand Mixer (Artisan Series) (with C-dough hook)
- Rectangular Japanese Loaf Pan (4.7 in. x 7.8 in. x 5.1 in. or 12 cm x 20 cm x 13 cm; 3100 ml; read this post on how to purchase it from Japan)
- Square Japanese Loaf Pan (4.7 in. x 5.3 in. x 5.1 in. or 12 cm x 13.5 cm × 13 cm; 2070 ml; read this post on how to purchase it from Japan)
- Digital Kitchen Scale
- Large bowl
- Dough scraper
- Rolling Pin
- Mister
From: Just One Cookbook